One lens, one frame, endless light. How the 23mm f/2, the leaf shutter, the built-in ND and film recipes add up to stunning photographs.
Scroll to explore
01 — The Lens
What the Aperture Actually Does
The X100VI's fixed 23mm f/2 (a 35mm equivalent field of view) is the whole camera. Aperture is your main creative dial: it trades light against depth of field — and on this particular lens, against sharpness wide open.
f/4 is home base. Open to f/2 for low light or deliberate softness; stop to f/8 for zone-focused street. Tap the apertures below and watch the simulated scene change.
Interactive — depth of field & brightness are illustrative for 23mm APS-C, subject at 3 m
Why not always f/2? Wide open, this lens is famously dreamy at close distances, and the focus plane is thin enough that a swaying subject drifts out of focus. By f/4 it is crisp corner to corner with enough depth to actually land the shot. f/2 is a choice, not a default — use it when the light demands it or the glow is the point.
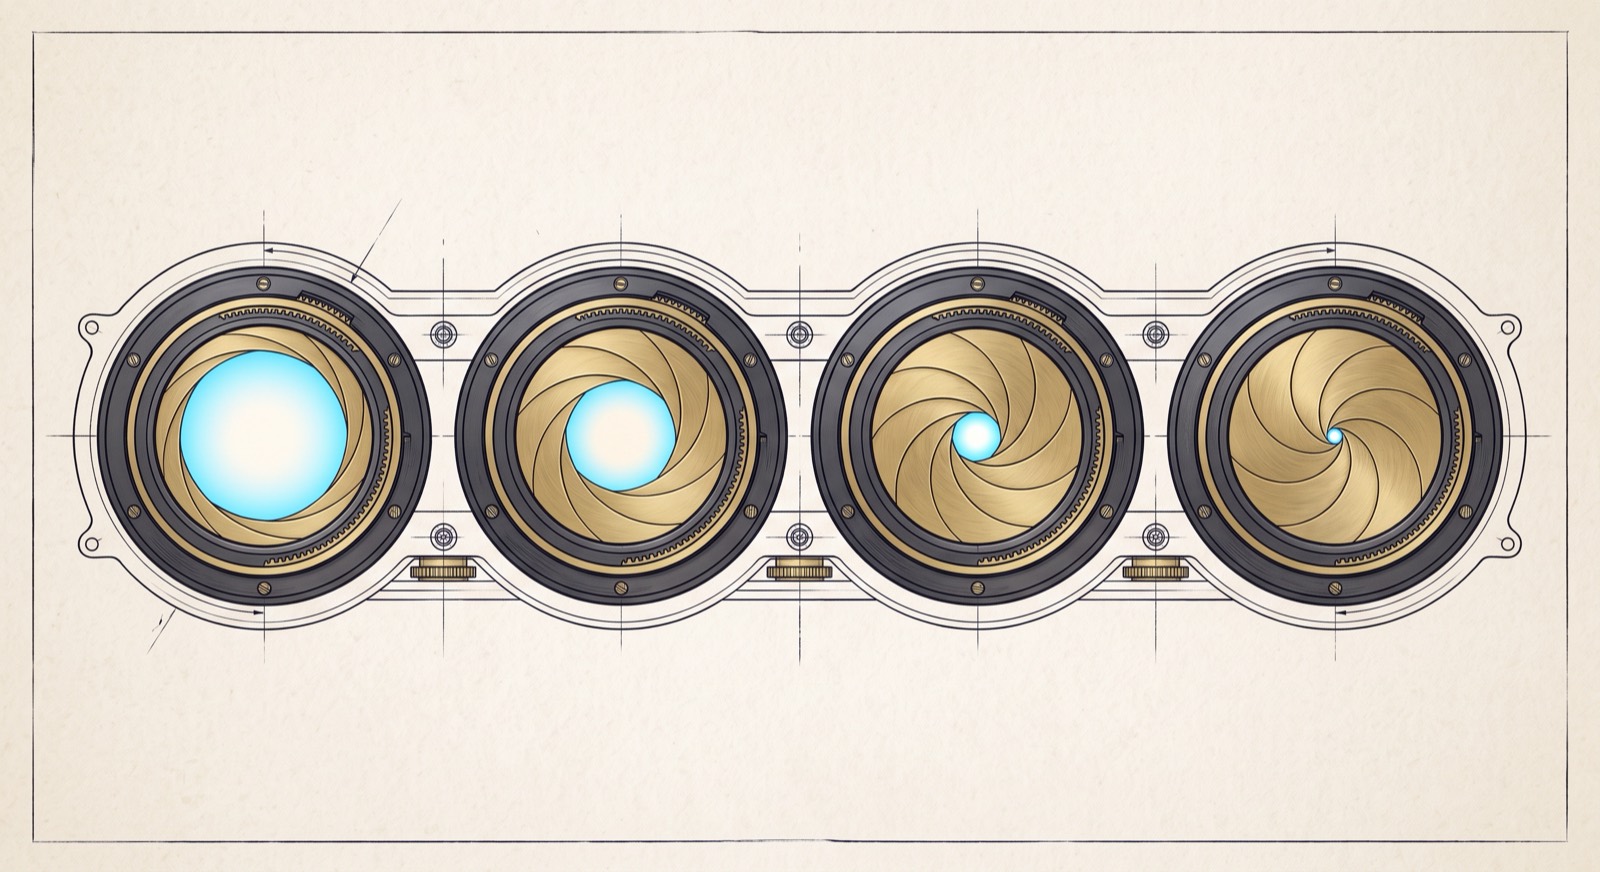
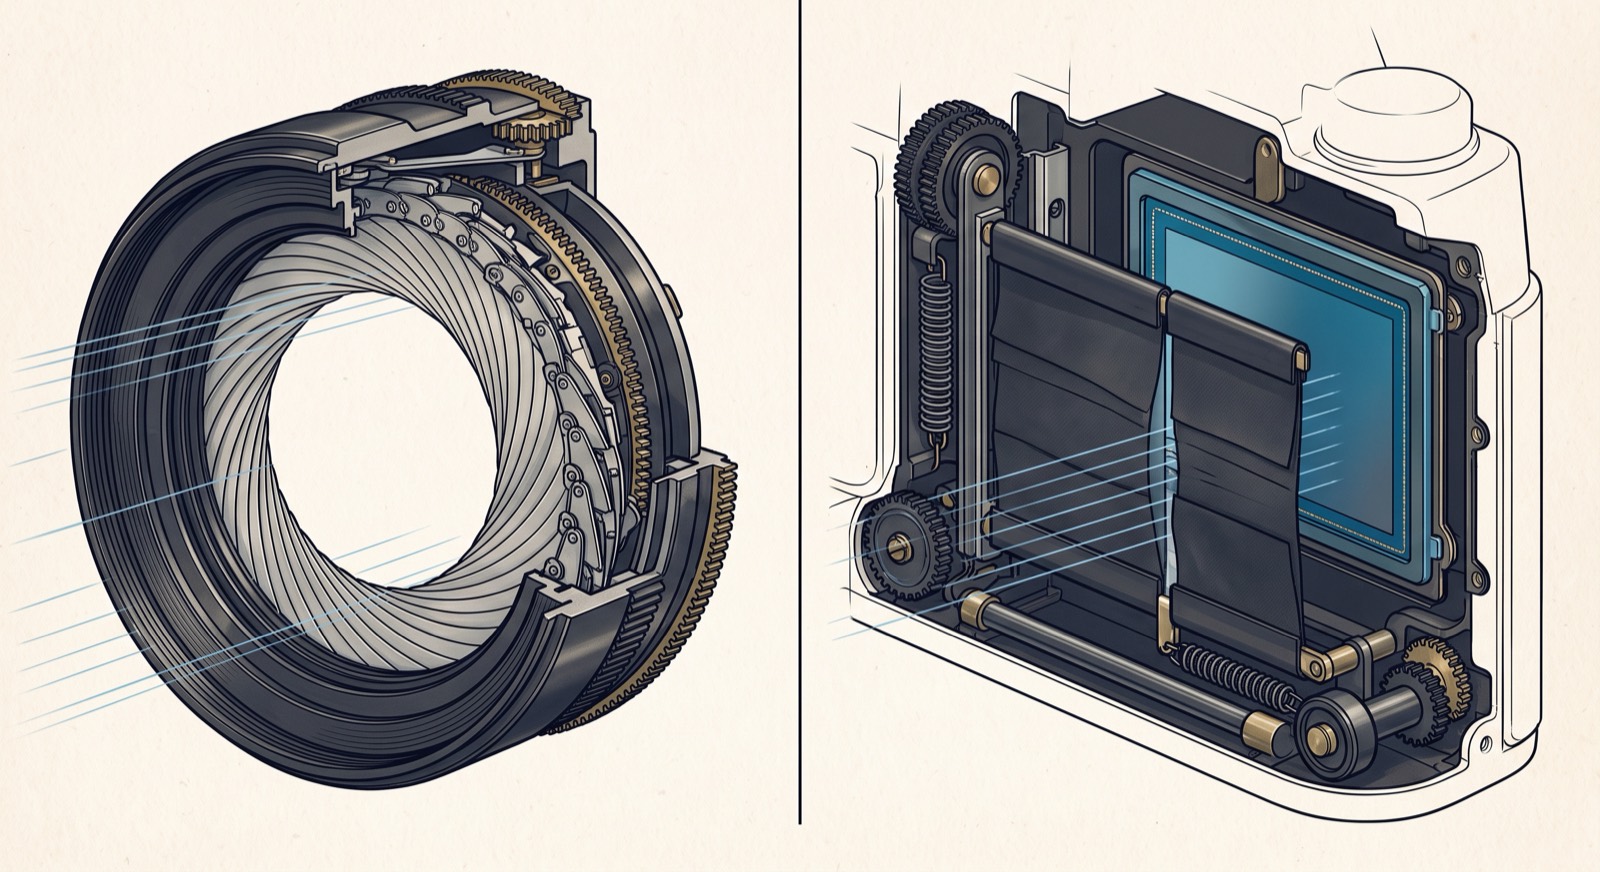
The geometry behind the f-numbers — nine blades walking from wide open to pinhole · rendered illustration (Gemini)
And yes — the lens changes after all. The front ring unscrews to reveal a 49mm thread, and Fujifilm makes two afocal converters that screw straight on. They bend the light before it ever reaches the fixed 23mm, scaling the focal length and the entrance pupil together — which is why f/2 stays f/2, all 40 megapixels stay, and the leaf shutter and ND never notice. The II versions carry a magnet the body detects: attach one and the camera silently applies its corrections and redraws the OVF framelines. The ritual is three moves: unscrew the front trim ring, thread the converter onto the 49mm mount, shoot — no menu visit needed (first-generation converters want CONVERSION LENS set by hand). The same thread takes the AR-X100 filter adapter that completes the weather sealing.
Afocal = no focus shift: only the angle of view changes — AF, leaf shutter, ND and close-focus all behave as before · unscrew trim ring → thread on 49mm → shoot
WCL-X100II · ×0.8
23mm → 28mm equivalent. The classic reportage width — rooms, tables, streets that won't step back. Full 40MP, f/2 intact, auto-detected. The cost: real money, real bulk on a pocket camera, and a look less "X100" — wider than the camera's soul.
TCL-X100II · ×1.4
23mm → 50mm equivalent. The portrait normal — tighter frames, kinder perspective for faces (§13). Full 40MP and f/2 stays f/2, which at 50mm-e means genuinely shallow depth. The glass answer to the portrait problem the digital TC solves for free.
Digital TC · ×1.4 / ×2
Crop, not glass: 50mm at ~20MP, 70mm at ~10MP. Free, weightless, on the control ring (§02) — but JPEG-only (RAW keeps the full frame) and unavailable in some modes. The honest split: digital for travel-light days, glass when the pixels are the point.
02 — Exposure System
No Mode Dial, Just Dials
The X100VI has no PASM dial. The exposure mode is implied by which physical dials you set to A — exposure is a conversation between three dials, readable with the camera off. Tap a mode below to see the dial states.
Every full stop doubles or halves the light — aperture, shutter, ISO, and the ND are four trading axes
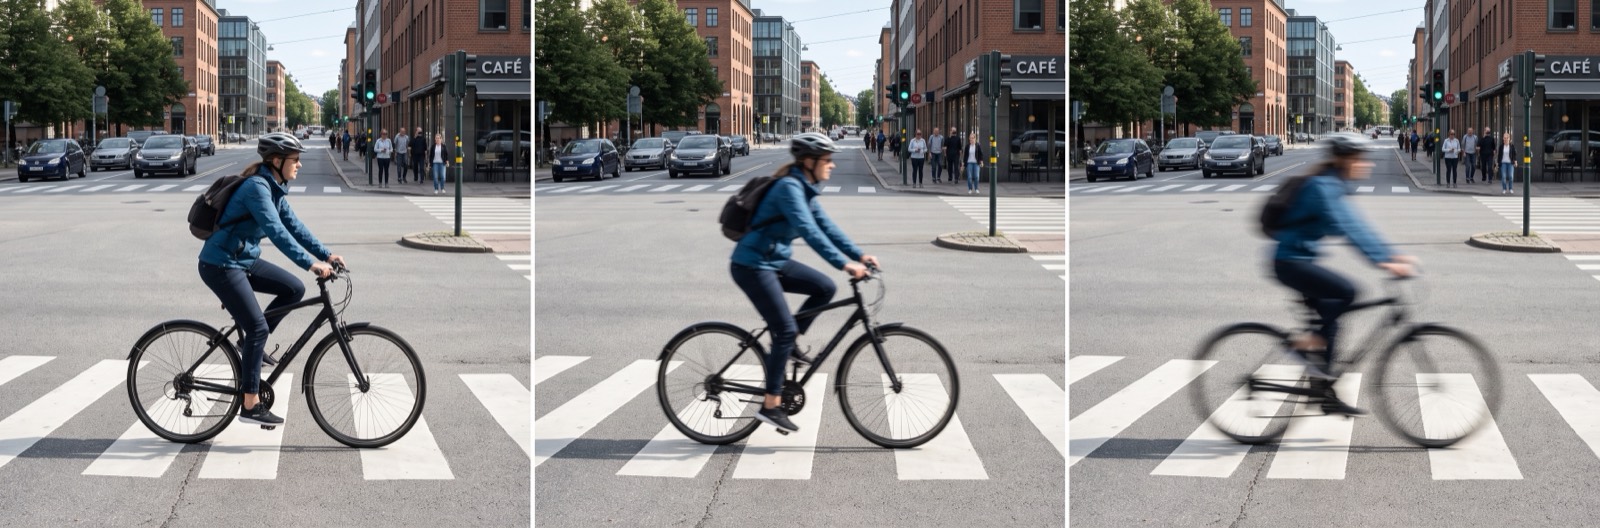
The shutter dial’s whole personality — 1/1000 freezes, 1/60 hints at motion, 1/8 lets it flow · rendered comparison (Gemini)
The underrated pro mode
Manual + Auto-ISO: lock f/4 · 1/500 for a consistent look and motion rendering, let ISO absorb the light. Exposure compensation still works — it biases which ISO the camera picks. A quirk most people miss.
Auto-ISO is a three-number contract per bank: default sensitivity (e.g. 125), max sensitivity (e.g. 6400), minimum shutter speed (e.g. 1/250). The algorithm: hold default ISO and lengthen shutter until it hits the minimum → then raise ISO to the max → only then let shutter drop below. That order explains every "why did it pick that?" moment. Set three banks: Street 125/6400/1/250 · Static & dim 125/6400/1/60 (IBIS carries it) · Motion 125/12800/1/500.
The two lens rings. The clicked aperture ring (nearest the body — ⅓-stop clicks, A position, two grip tabs) and the smooth control ring at the front. The control ring is the camera's chameleon: assign it via BUTTON/DIAL SETTING → CONTROL RING SETTING to one of four roles — and its default, Standard, secretly changes function with your focus mode.
With AF+MF enabled, half-press then turn the ring — instant manual override, no mode switch
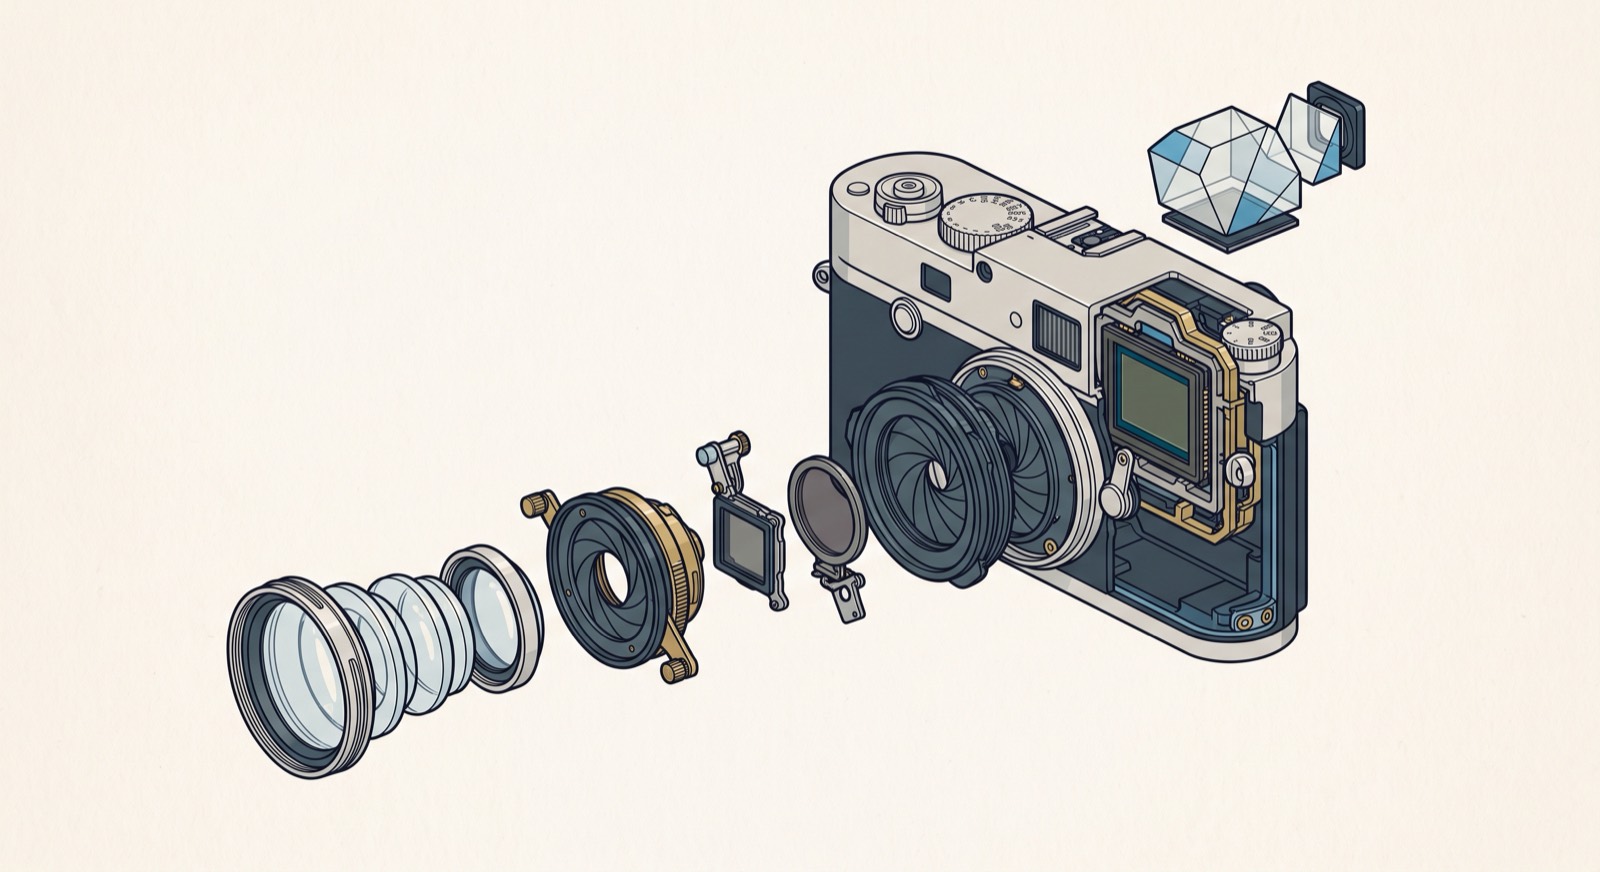
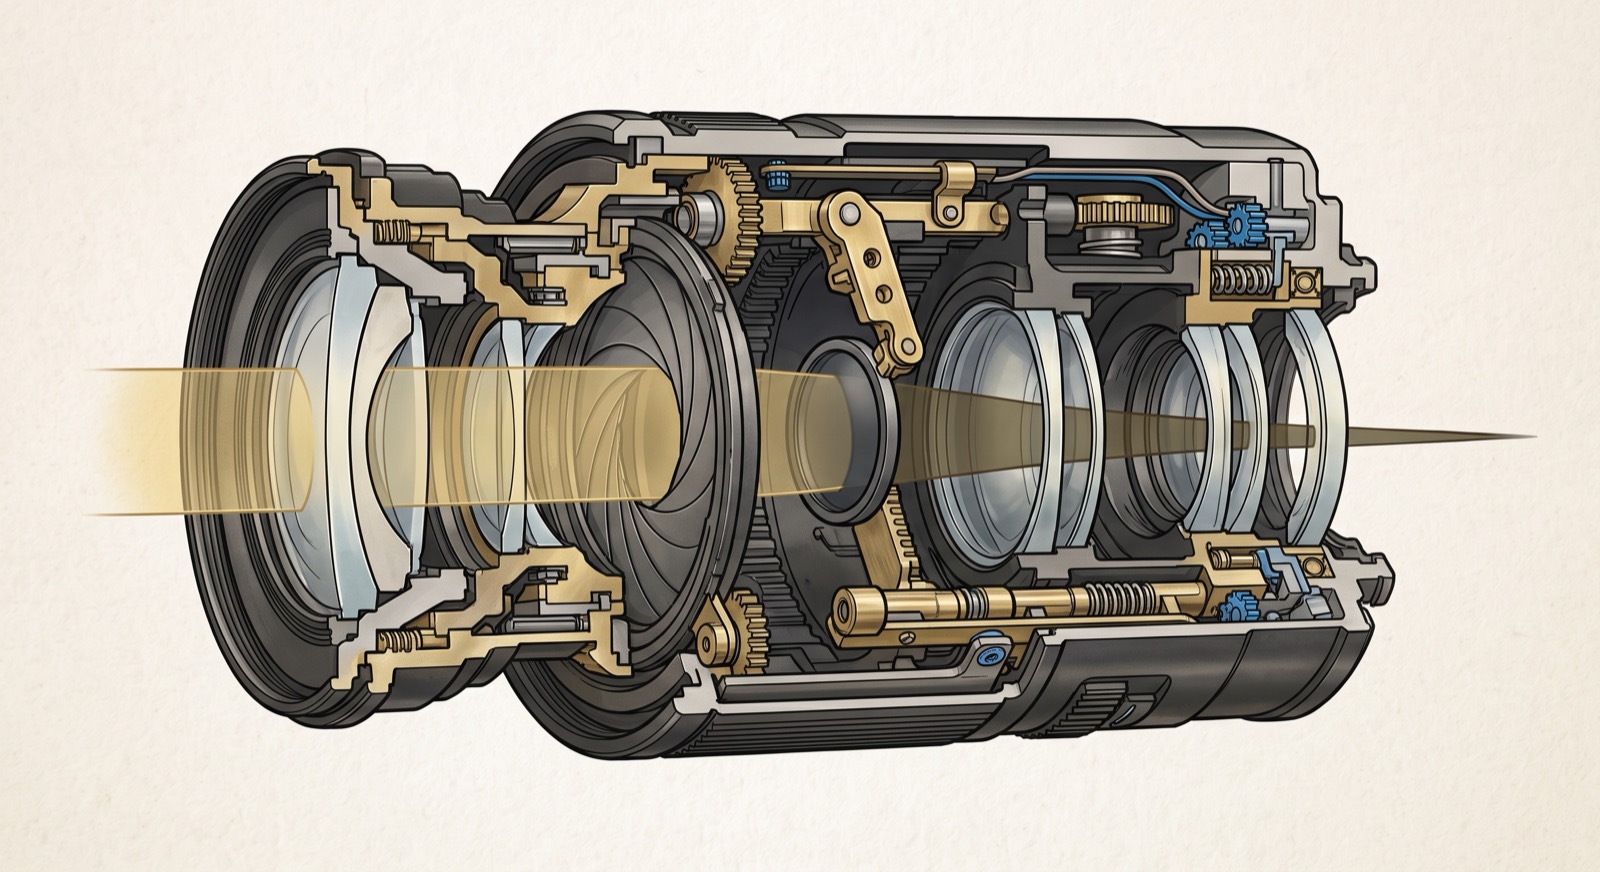
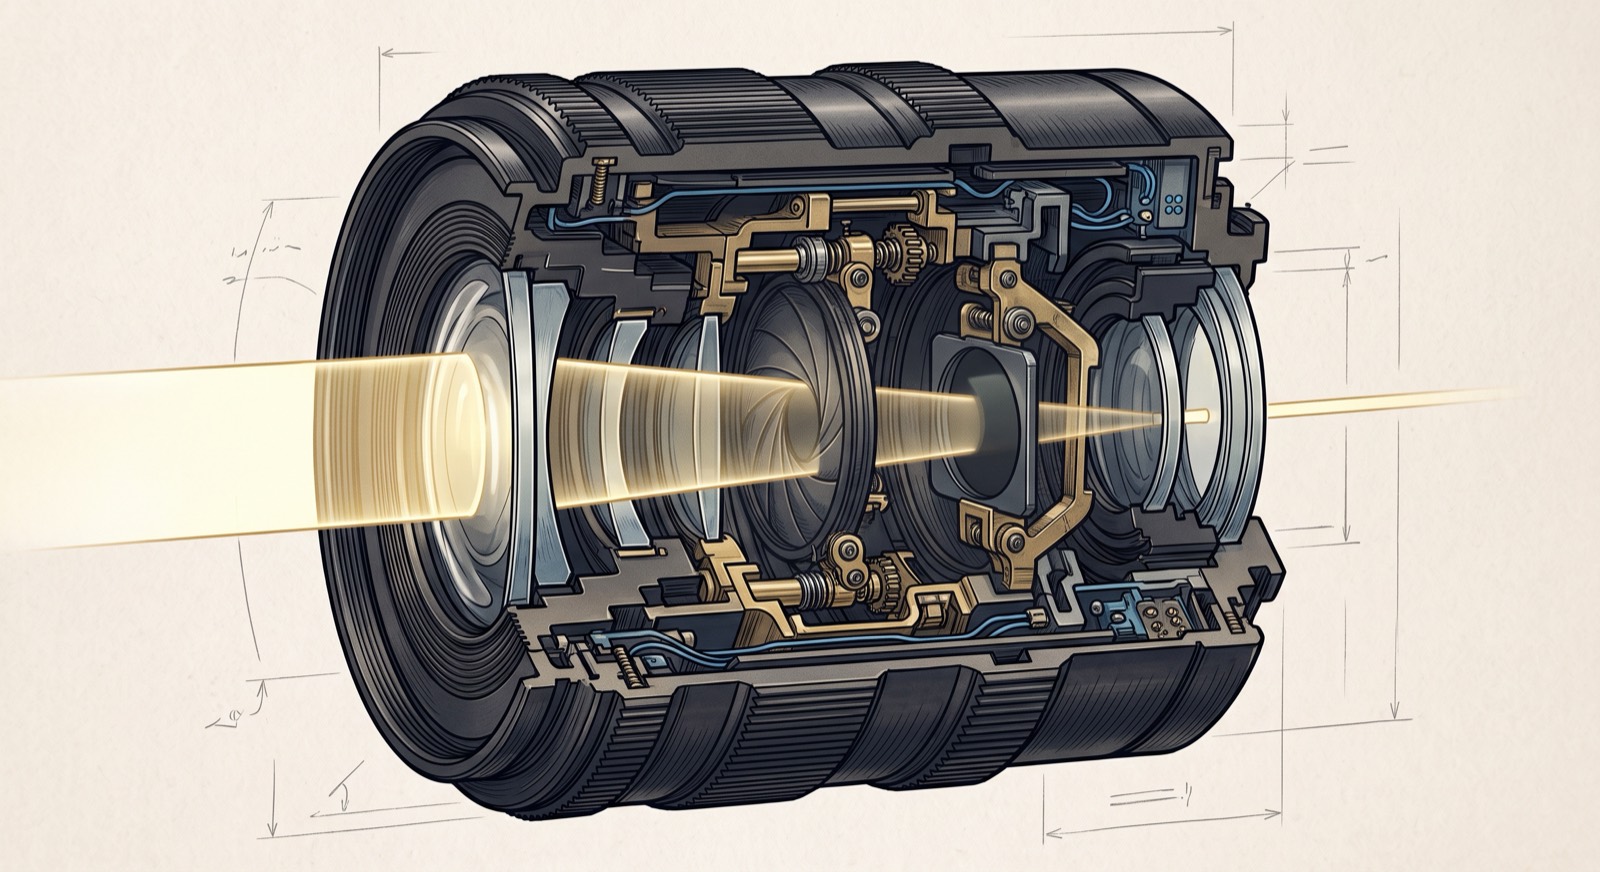
What the rings drive — glass, iris, and focus mechanics in one barrel · rendered cutaway (Gemini), generic construction rather than the actual 23mm
Three ways to run the ring
Recipe switcher: assign Film Sim and roll between your C1–C7 looks without leaving the finder. Zoom-ish: keep Standard and treat the digital TC as a 35/50/70 three-prime kit (watch the frame-line indicator). Focus purist: shoot MF where it's always the focus ring — set rotation direction and linear response in BUTTON/DIAL SETTING to make focus-by-wire feel mechanical.
03 — Metering
The Meter's One Assumption
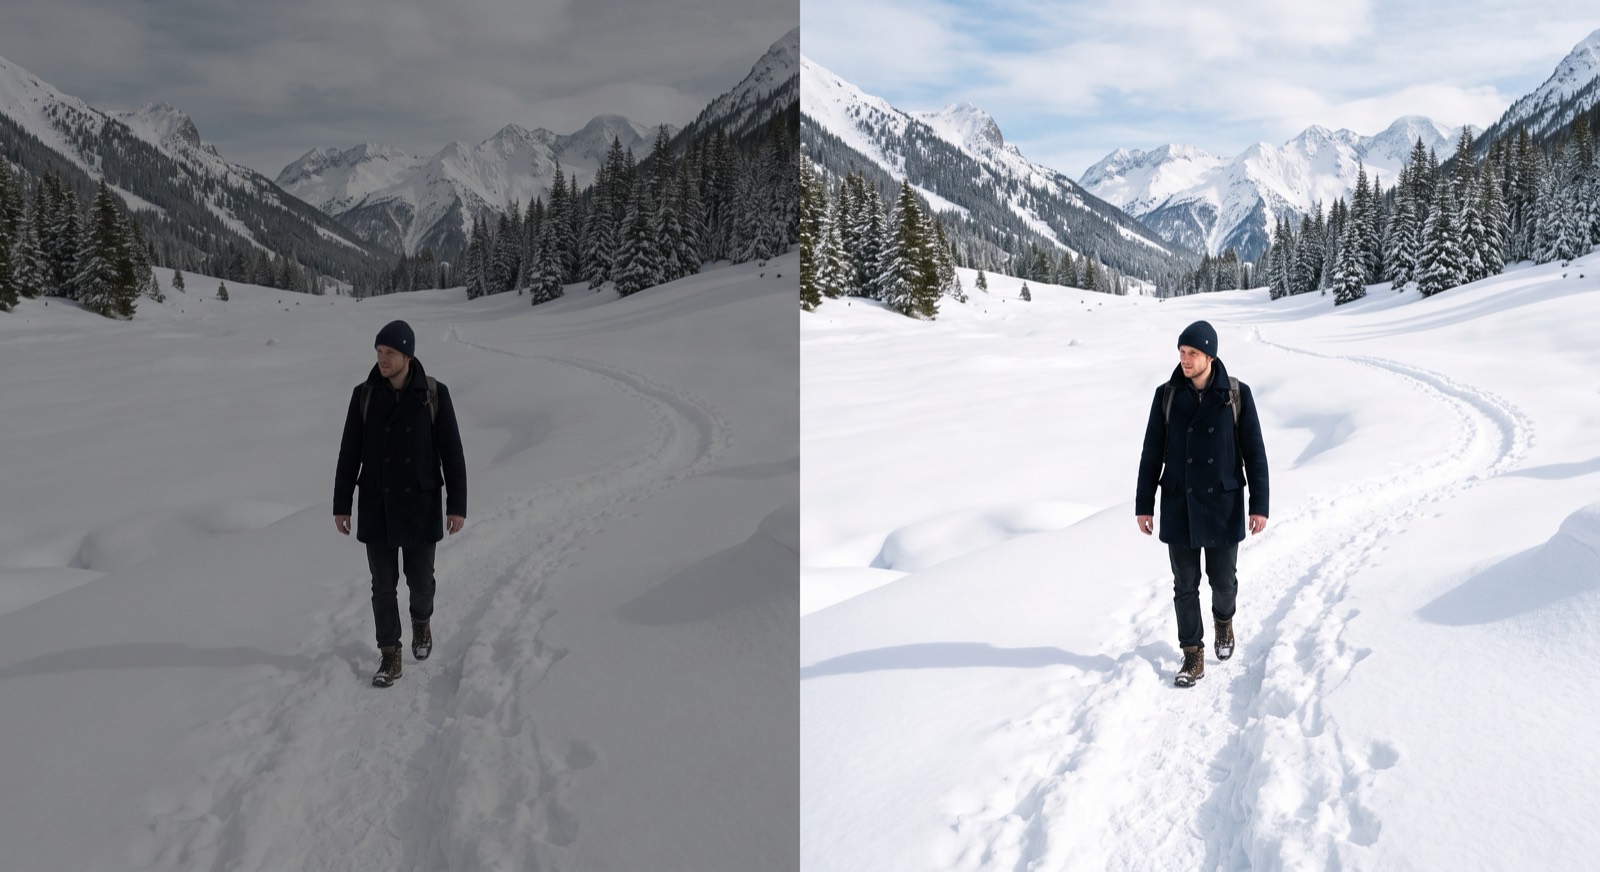
The camera never measures the light falling on a scene — only the light bouncing back off it. That's reflective metering, and it rests on a single act of faith: averaged out, the world reflects about 18% of the light — middle gray. When a scene really does average near gray, the meter is dead-on. When it doesn't — snow, backlight, night — it misses predictably. And predictable is fixable.
The whole game
The meter is never wrong — just literal. It renders whatever it reads as middle gray: white snow comes out gray, black night comes out gray. Learn the three classic traps below and exposure compensation stops being a rescue and becomes a reflex.
In P · A · S the camera self-centers the needle — the EC dial is how you overrule it · in M the needle is passive, just reporting your deviation · needle = the meter's opinion, histogram = the outcome
How do you know which scene you're standing in? You don't judge it — you read the camera. The finder is already showing the photograph you're about to take, and the histogram names the trap before you press anything.
EVF vs Your Eyes
Two eyes open — one on the finder, one on the world. Snow that looks white to you and grey in the EVF is the meter failing, visible before the shutter. The caveat that makes it work: SCREEN SETTING → PREVIEW EXP./WB IN MANUAL MODE → ON, and NATURAL LIVE VIEW → OFF — both otherwise show a flattering finder instead of the exposure.
The Histogram, Not the Needle
Add it with DISP. CUSTOM SETTING → HISTOGRAM, then read the shape: one middle hump = even, trust it. A middle hump while you look at white = snow trap, dial +. Two humps = backlit, pick a side. Piled left at night = correct — lifted to the middle means mud.
Blinkies Mark the Ceiling
HIGHLIGHT ALERT → ON flashes what has already clipped. The asymmetry that decides everything: shadows lift two stops in post (§10); a blown highlight is gone forever. When the histogram shows two humps, protect the right wall.
The Five-Stop Swing
Want a number instead of a shape? Spot-meter the brightest thing that must hold detail, then the darkest, and watch the needle swing. Within ~5 stops, one frame holds it. Beyond that you are choosing a side — or buying headroom with DR200/400 (§07). This is the manual version of what the OM-1's Spot HI/SH automates.
Setting names as printed in the Fujifilm X100VI owner's manual.
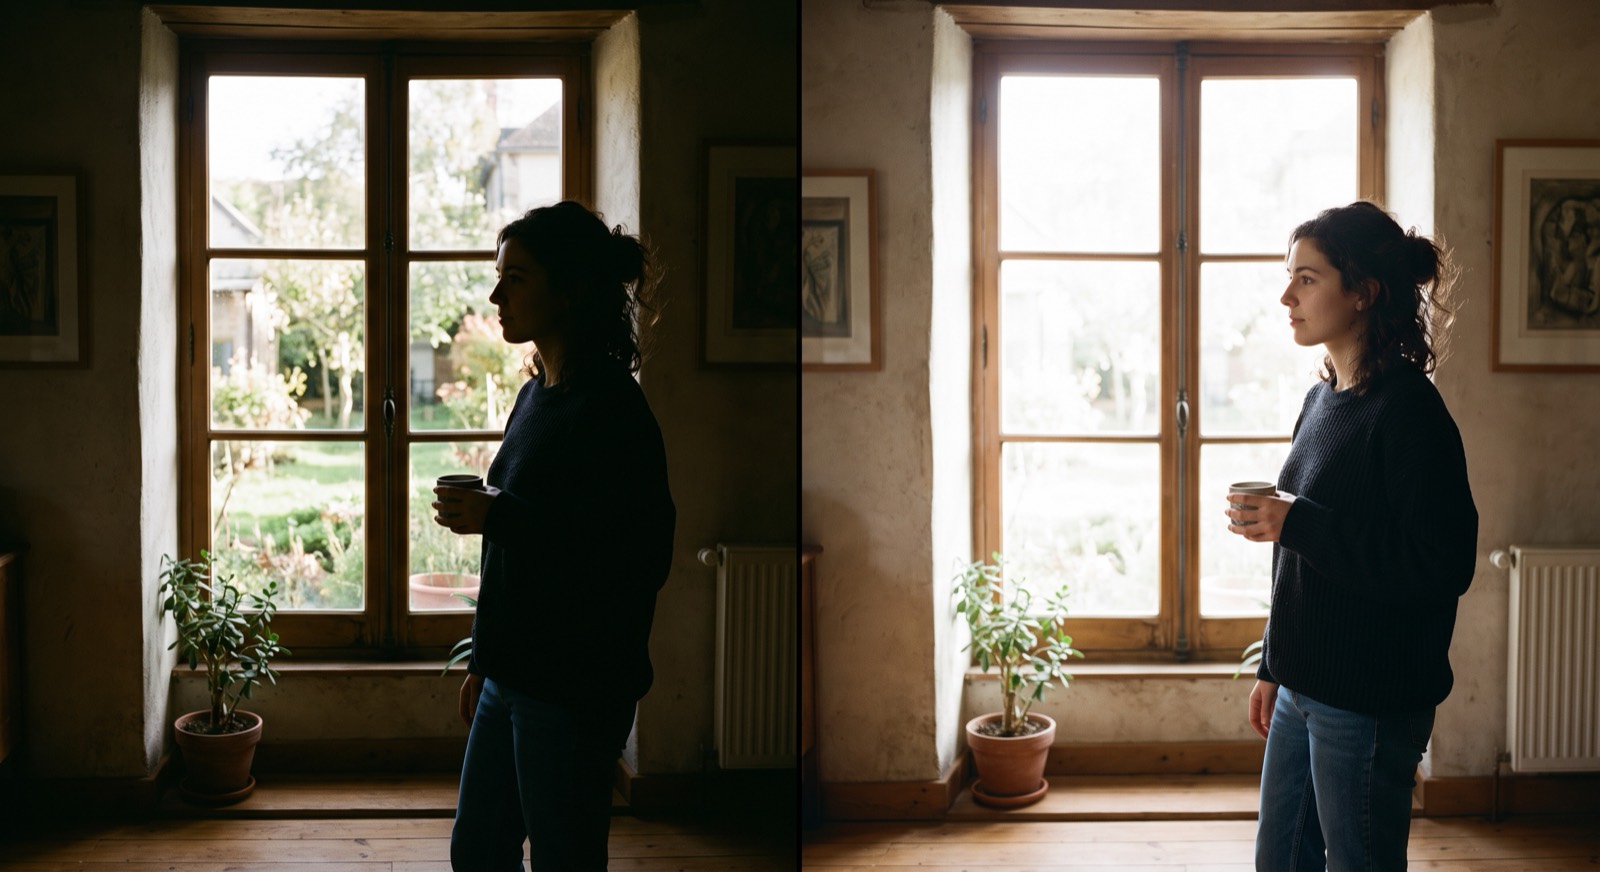
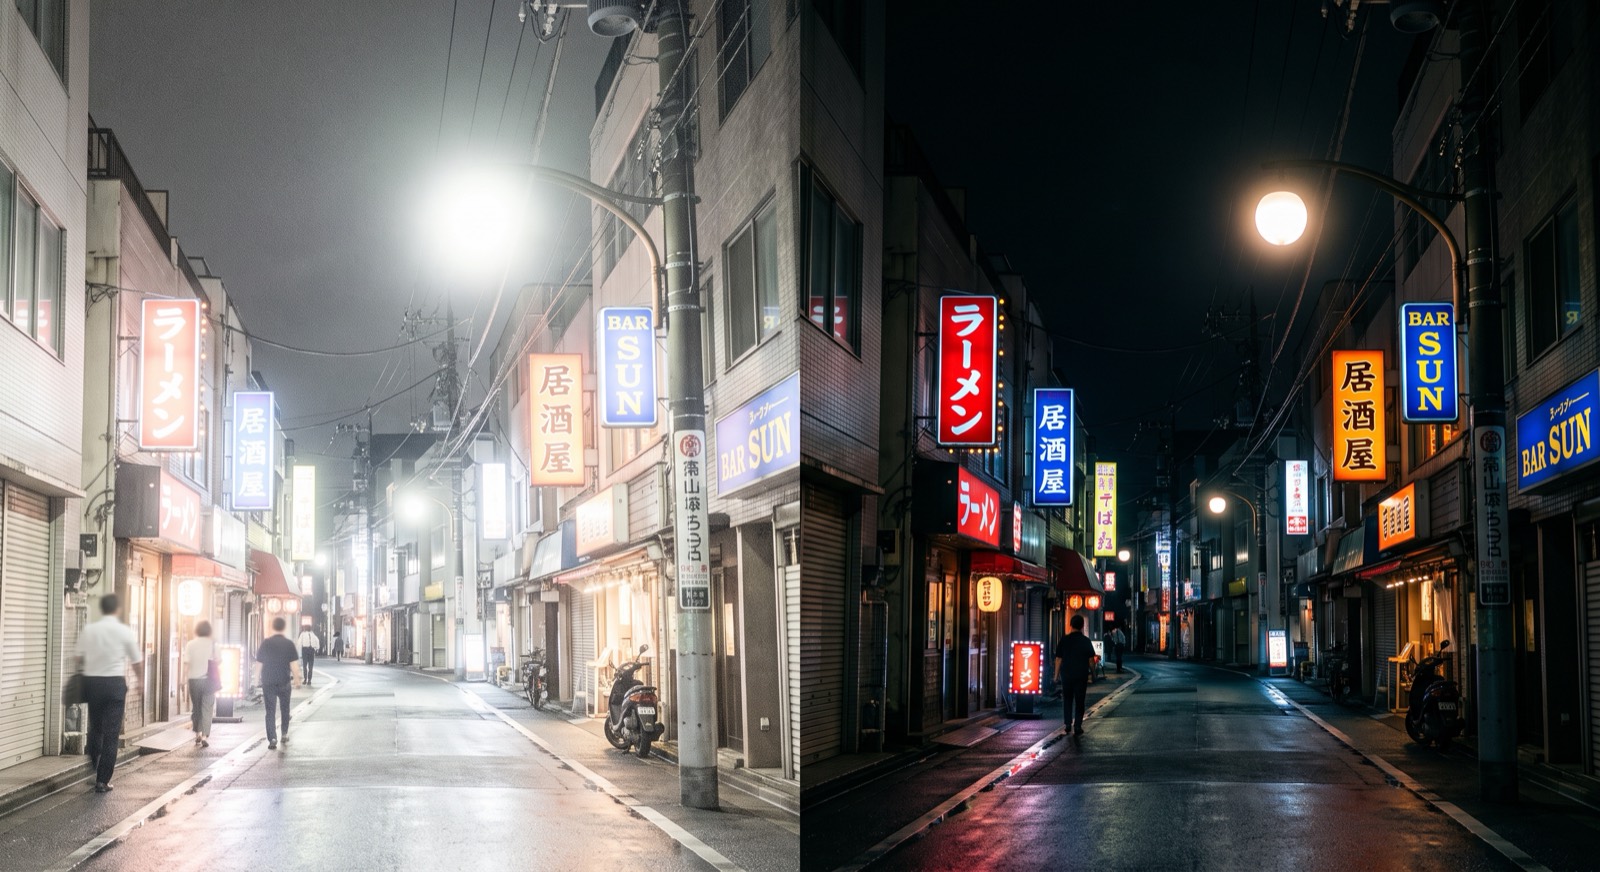
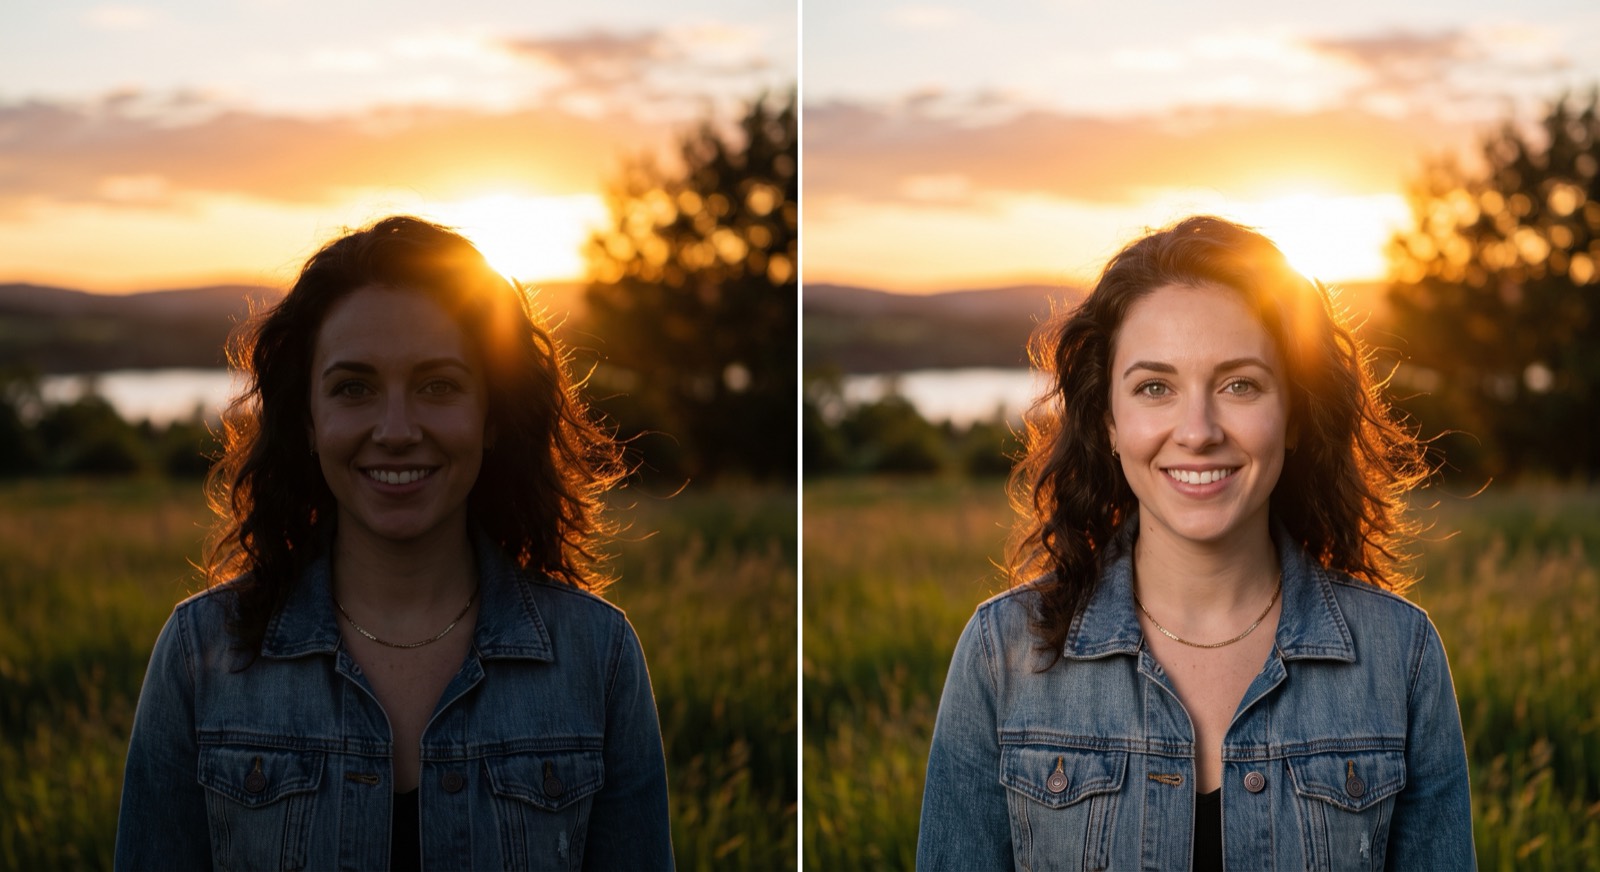
The traps, seen. Same scene, two exposures — the one pairing you can't source as a real photograph, which is why these three are renders (Gemini), and labeled as such. Left half: the meter's literal reading. Right half: the frame you wanted.
Backlit · silhouette → face spot-meteredRendered comparison — Gemini
Night · lifted to murk → yours at −1 EVRendered comparison — Gemini
Four photometry patterns decide which pixels get a vote in that average. Multi is right most of the time — it reads 256 zones and pattern-matches the scene. The other three are fixed weightings you can predict in your head, which is exactly their value: pick one when you want to out-think the pattern-matcher.
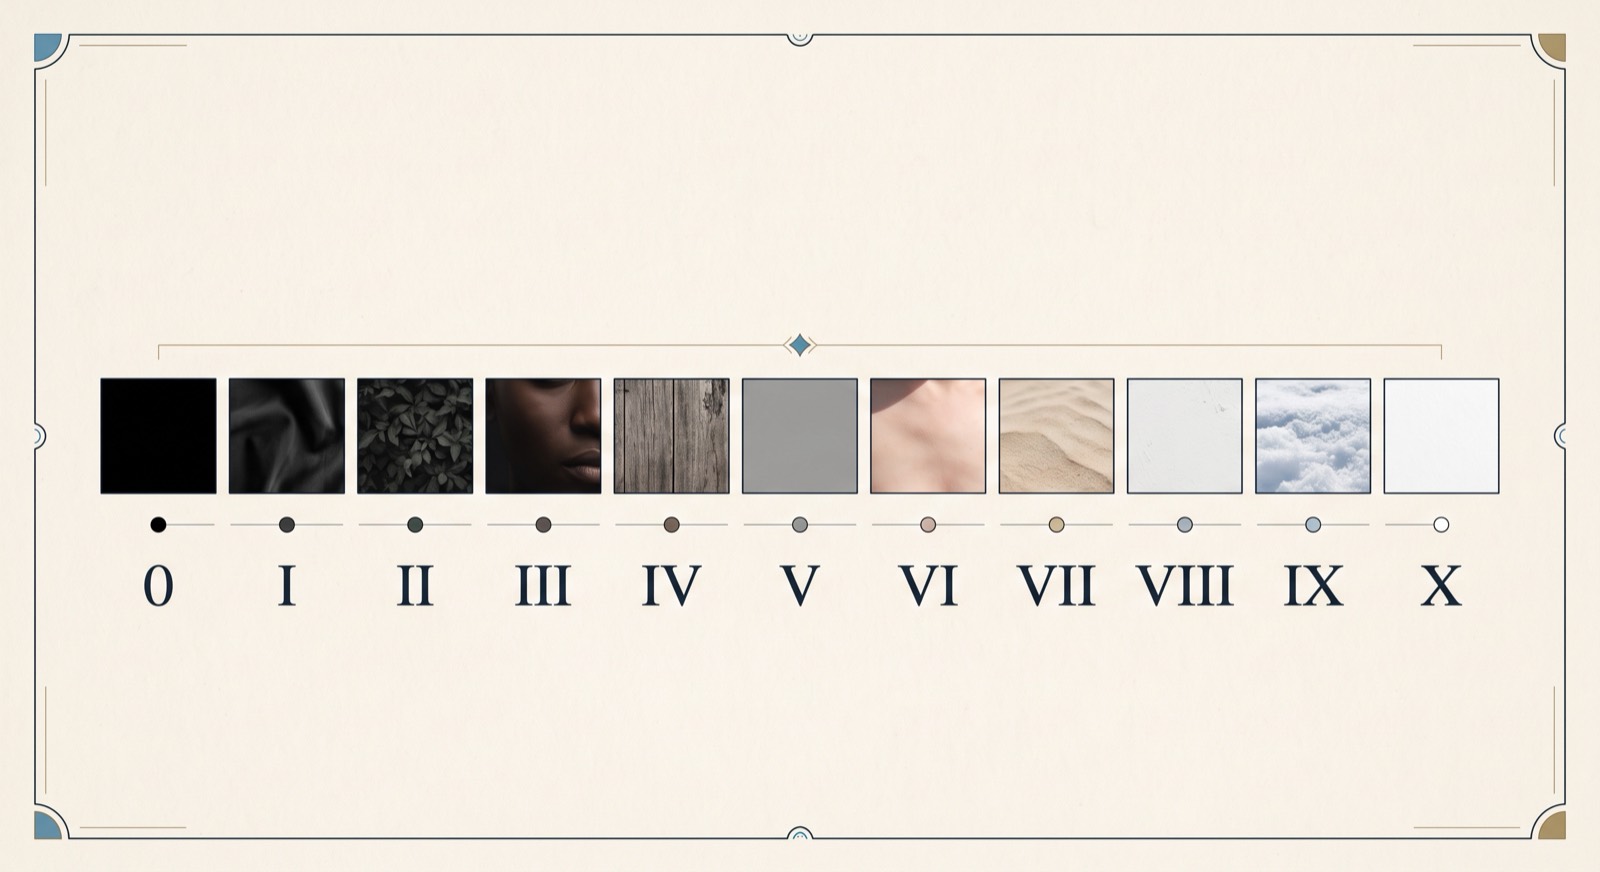
The zone system, 0–X — spot-meter any patch and the camera drags it to V; the EC dial walks it back where it belongs · rendered chart (Gemini)
Spot × AF Interlock
AF/MF SETTING → INTERLOCK SPOT AE & FOCUS AREA → ON. The 2% spot now travels with your focus point — meter the off-center face you're focused on, not whatever sits in the middle of the frame. Kills the meter-then-recompose error in one menu toggle.
AEL: Freeze the Reading
Point at the tone that matters, press AEL, recompose freely — the reading stays frozen. Set AE LOCK MODE → SWITCH so it toggles instead of needing a held thumb. In AF-S a half-press already locks exposure with focus; AEL is for when you want them separated.
The OM-1 Trick, Ported
OM System bodies have dedicated Spot-HI / Spot-SH modes: one spot reading placed at white or black instead of gray. The X100VI doesn't — but the move is two gestures: spot a highlight, dial +2 EV to keep it white; spot a deep shadow, −2 EV to keep it black.
Needle vs Histogram
The needle reports the meter's opinion; the histogram shows the actual tonal spread — and the EVF preview is the exposure you'll get. When they disagree, the histogram wins: guard the right edge, because clipped highlights are the one thing no recipe or RAW lift brings back.
04 — Light Control
The Built-in ND: Sunglasses for the Lens
The X100VI hides a 4-stop neutral density filter behind the lens. Each stop halves the light, so four stops means only 1/16th gets through — color, focus and depth of field untouched. It exists to let you break the sunny-day rules.
What it physically is: a neutral-density glass element that swings into the optical path behind the lens when engaged — internal, instant, sealed, no vignetting, no color cast. The arithmetic from Sunny 16: bright sun ≈ ISO 125 · f/16 · 1/125. Re-expressed at f/2 that's 1/8000 — beyond the mechanical shutter wide open. Flip the ND on and it becomes 1/500 at f/2: mechanical, flash-capable, artifact-free.
When it hurts: indoors and at night it silently costs 4 stops of ISO. Map it to a function button and the Q menu so its state is always one glance away — and check the video-mode auto-ND setting so it never surprises you.
The mechanism itself — a 4-stop ND element on its pivot arm, swung into the path; the beam leaves dimmer than it arrived · rendered cutaway (Gemini)
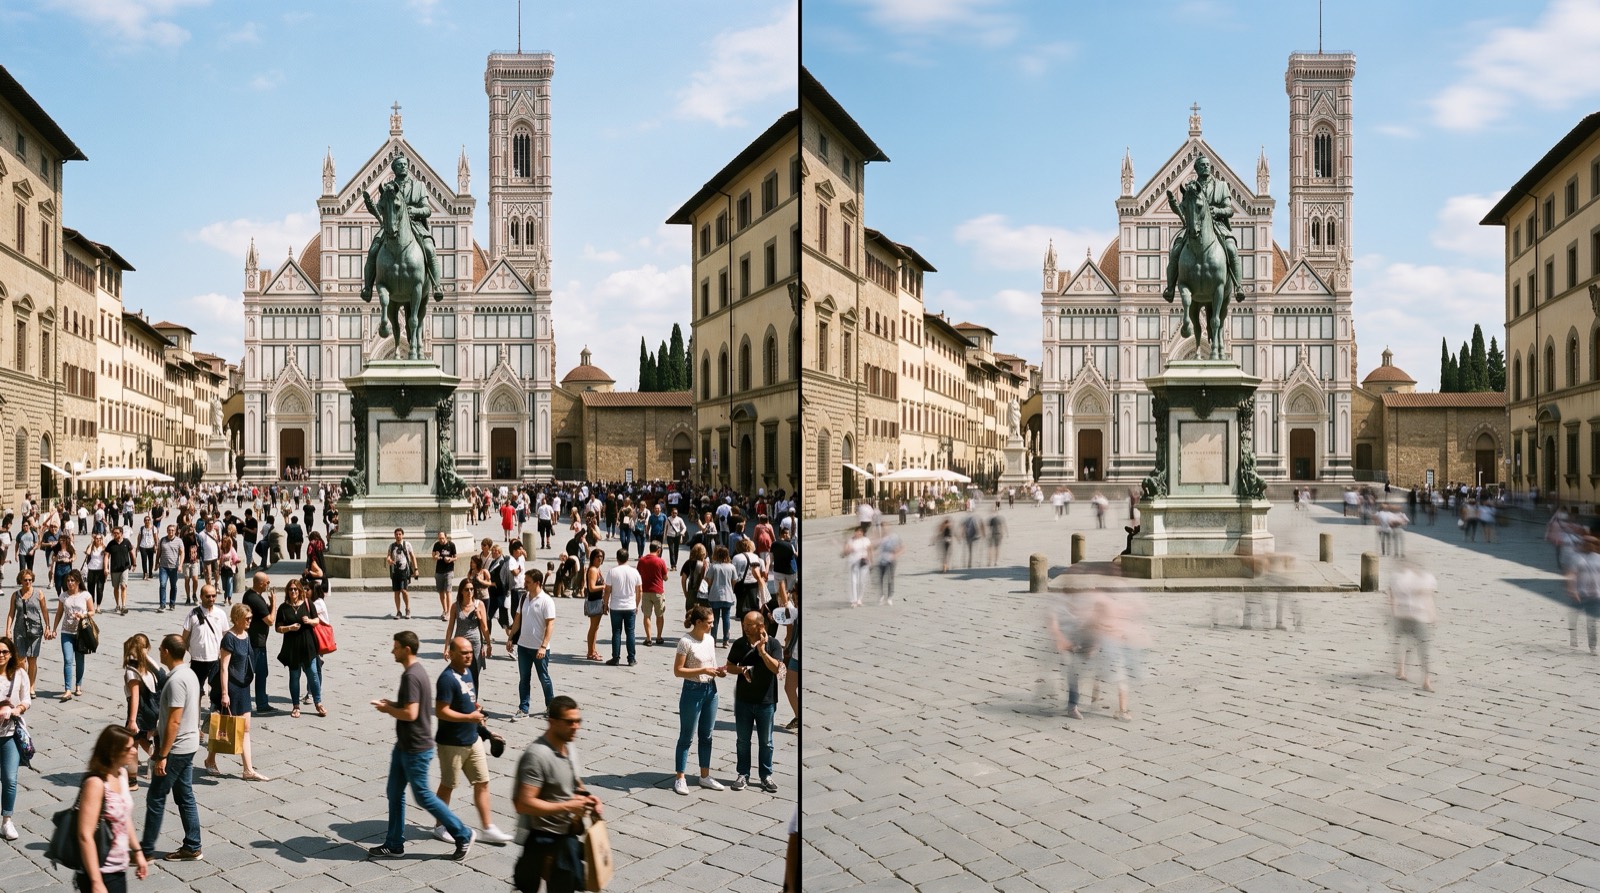
Four stops of ND, applied — the crowd is still there; a half-second simply refuses to record it (technique in §10) · rendered comparison (Gemini)
05 — The Secret Weapon
Leaf Shutter: Flash at Any Speed
Your OM-1 II's focal-plane shutter is a travelling slit — flash only works while the whole frame is open, capping sync around 1/250s. The X100VI's leaf shutter lives inside the lens and opens like an iris: the entire frame exposes at once, so flash syncs at essentially any mechanical speed — with a taper: at the fastest speeds the blades are only fully open briefly, so effective flash output drops as speed rises. Full benefit through ~1/500–1/1000, usable beyond at reduced power.
Why the flash rule exists — leaf blades open the whole frame at once; a focal-plane slit only ever shows the flash a stripe · rendered cutaway (Gemini)
The payoff — daylight fill at any shutter speed: face lifted, ambient untouched · rendered comparison (Gemini)
06 — Focus
The Machinery of Sharp
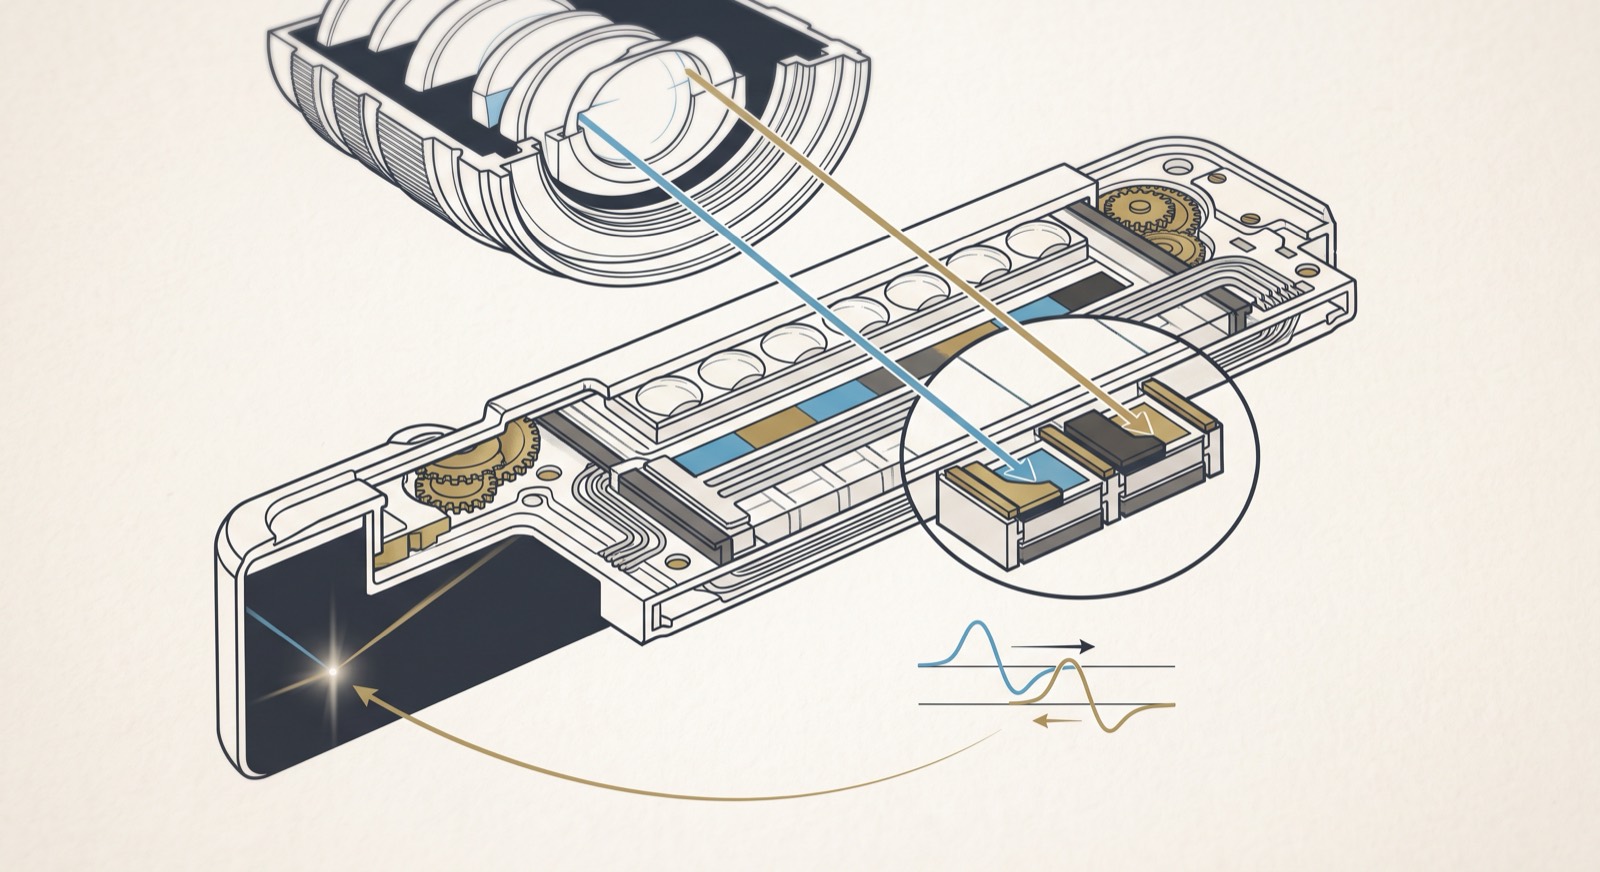
Hybrid AF: phase-detect pixels across the sensor are fast and directional — they know which way and roughly how far to move the lens — while contrast-detect refines the landing. Subject detection (X-Processor 5) recognizes humans, animals, and vehicles; low-light AF works to about −4 EV wide open.
Modes and areas.AF-S locks once on half-press — static subjects, focus-recompose. AF-C tracks — pair with Zone 3×3. MF unlocks the focus aids and zone focusing. Areas: Single point (6 sizes; medium is the sweet spot), Zone (3×3/5×5/7×7), Wide/Tracking (cedes control — skip for street). Enable AF+MF in the menu: half-press to AF, then turn the ring to refine without switching modes. And back-button focus (Shutter AF off, AF-ON on AEL/AFL) decouples focusing from firing — focus once with the thumb, shoot freely with the finger.
MF aids, ranked: focus peaking (red or yellow, low) is the workhorse; digital split image and microprism are rangefinder nostalgia. The real instrument is the distance scale with its blue depth-of-field bar — at f/8, watch it swallow the whole street.
The hyperfocal math, honestly
H ≈ f²/(N·c) → 23² / (8 × 0.02) ≈ 3.3 m at f/8 (c = 0.02 mm, APS-C convention). Focus there and ~1.65 m → ∞ is acceptably sharp. Conventions vary and 40MP pixel-peeping tightens them — treat hyperfocal as a zone, not a line, and bias focus slightly far. At f/5.6: ≈ 4.7 m · at f/11: ≈ 2.4 m.
At 35mm-equivalent and f/8, physics does the focusing for you. Set manual focus near the hyperfocal distance (~3 m) and everything from about 2 m to the horizon is acceptably sharp — no AF lag, no missed moments. Just raise, frame, press.
Hyperfocal at f/8 ≈ 3.3 m (c = 0.02 mm; conventions vary) — set ~3 m, bias far, treat it as a zone
Phase detect — masked pixel pairs see the lens from two sides; the offset between their signals says which way to focus, and how far · rendered cutaway (Gemini)
07 — Color
Film Recipes: One Scene, Four Souls
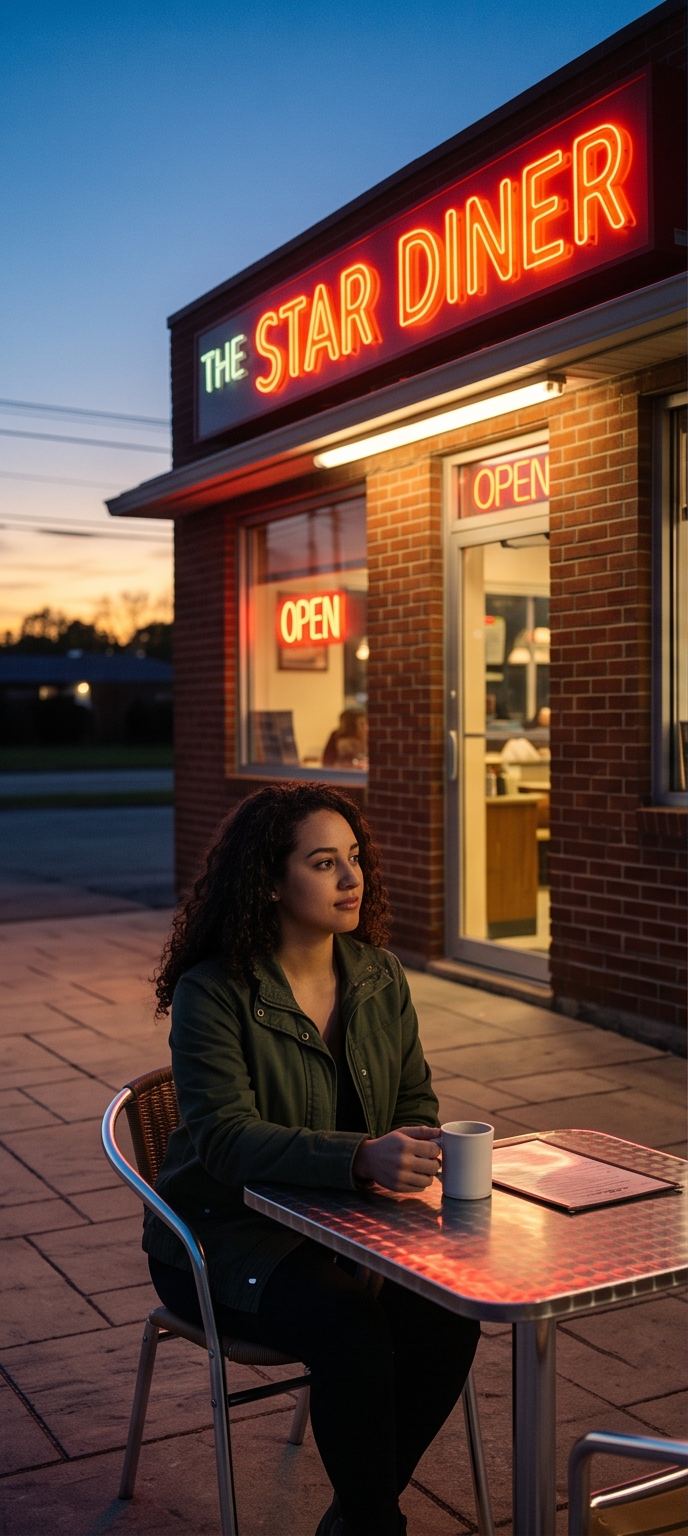
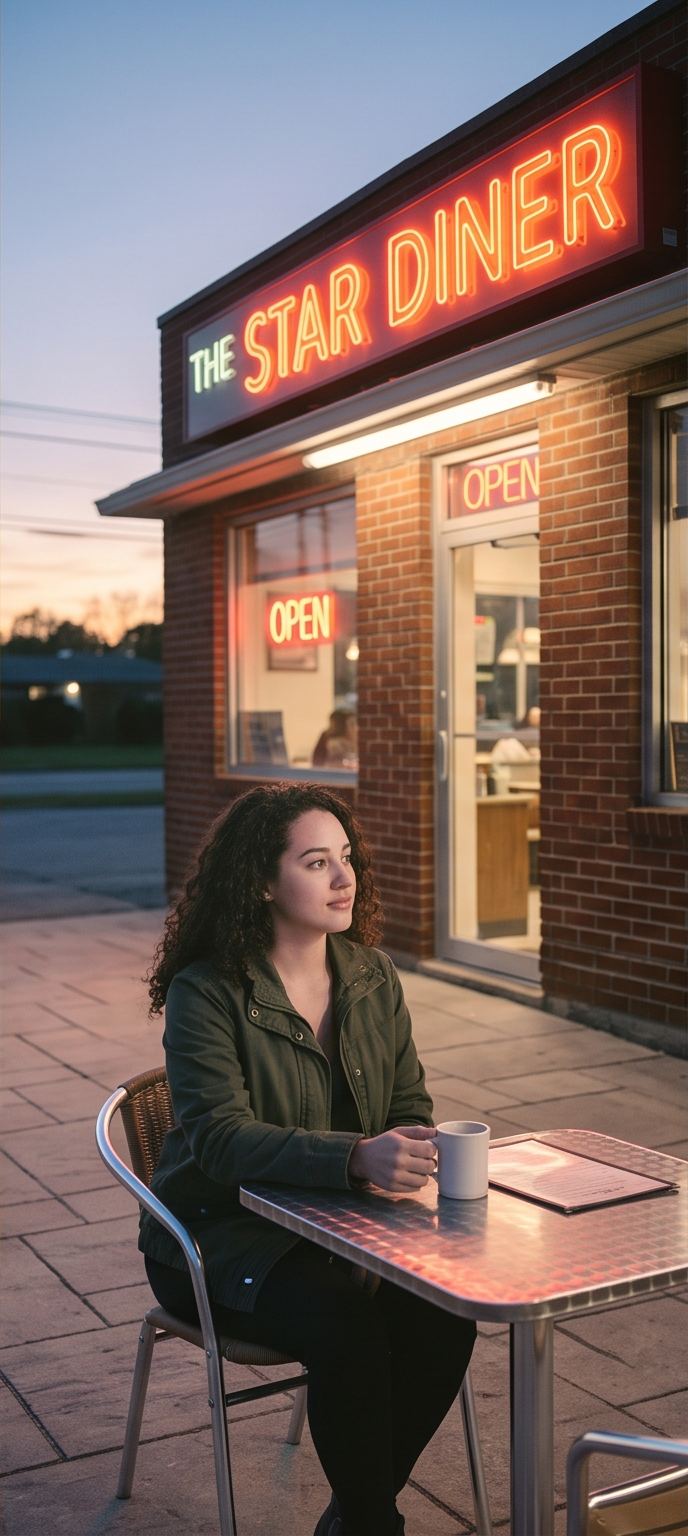
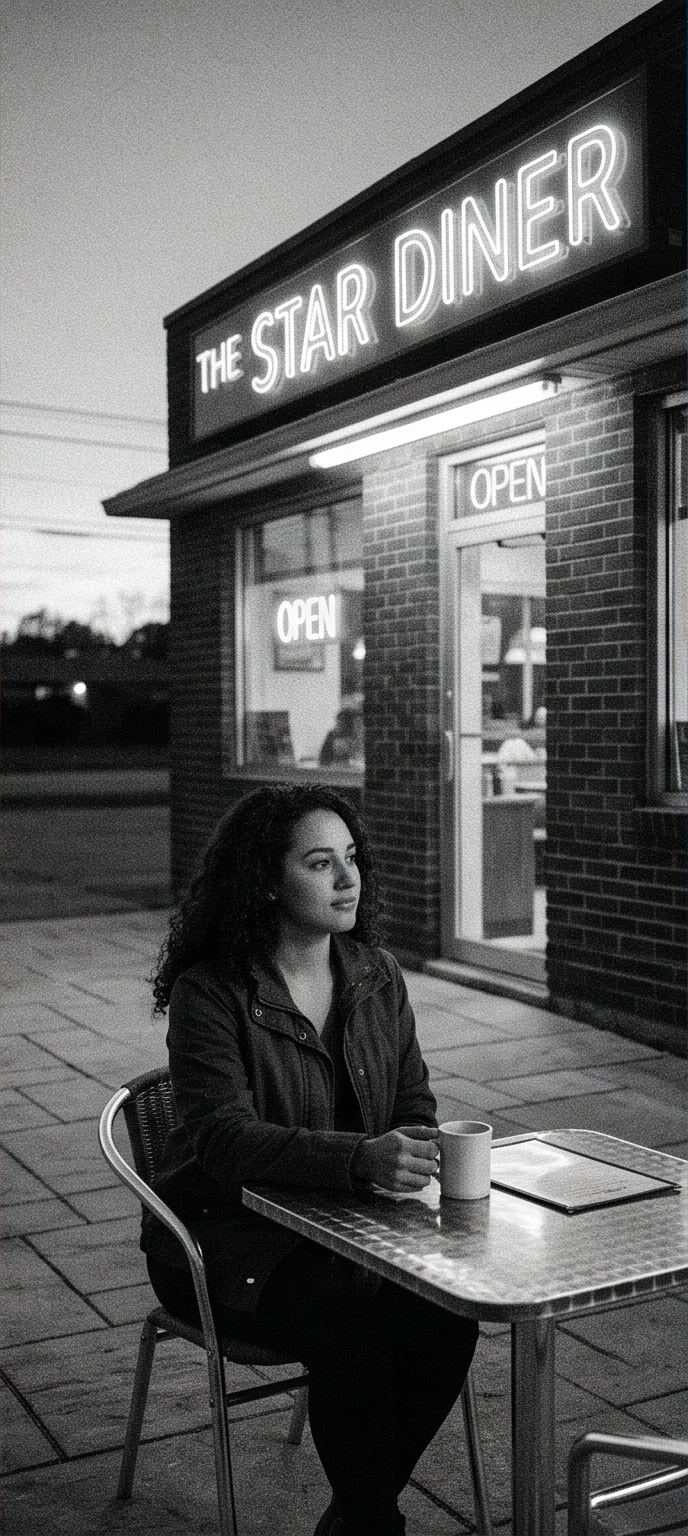
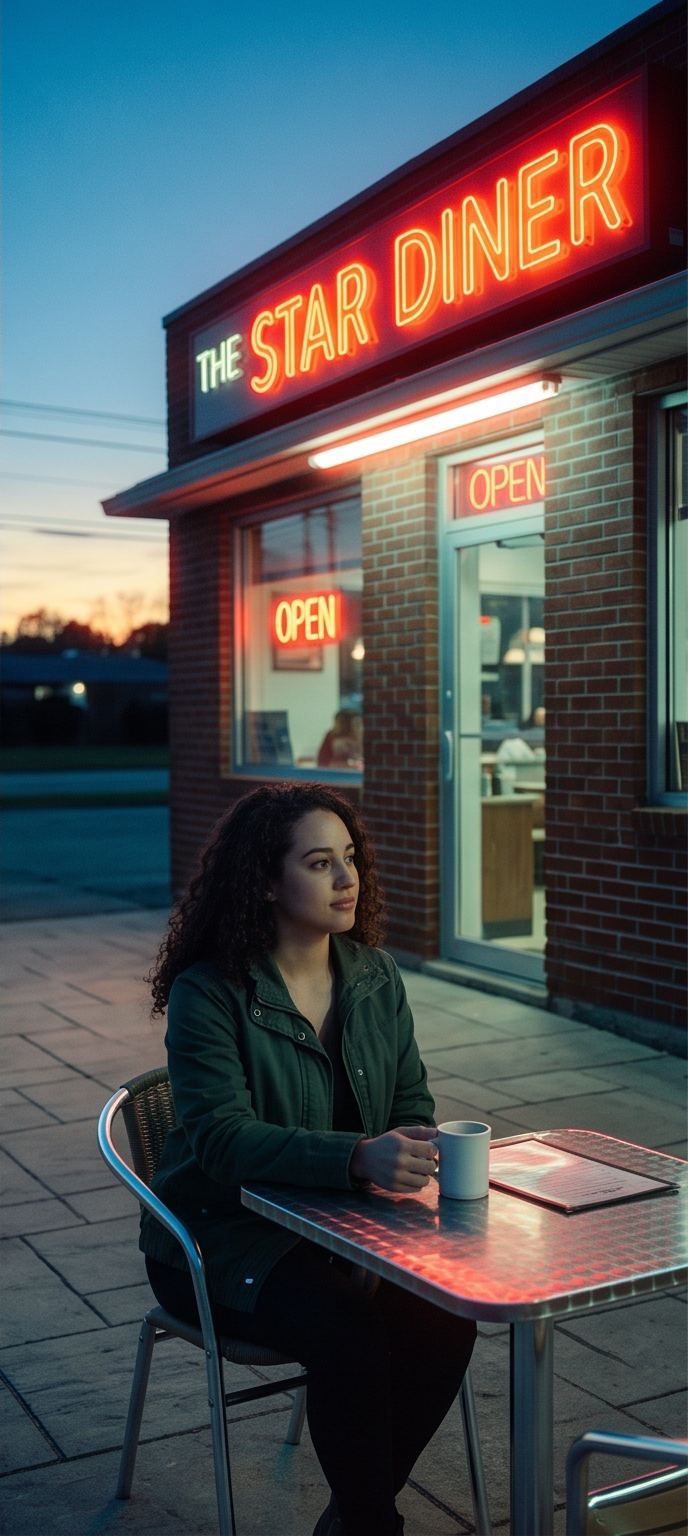
Recipes are custom JPEG settings layered on Fuji's film simulations — the fastest route to finished, characterful images straight out of camera. Program these into C1–C4. Parameters follow Fuji X Weekly (Ritchie Roesch); the panels below are one rendered scene (Gemini) re-graded four ways — same diner, four souls.
Kodachrome 64
Sunny days · golden hour
Classic Chrome · DR200
Grain Weak/Sm · CCE Strong · FX Blue Off
WB Daylight +2R −5B
H 0 · S +0.5 · Color +2 · Sharp +1
NR −4 · Clarity +3 · EC 0…+⅔
Kodak Portra 400 v2
Portraits · soft light
Classic Chrome · DR400
Grain Strong/Sm · CCE Strong · FX Blue Off
WB 5200K +1R −6B
H 0 · S −2 · Color +2 · Sharp −2
NR −4 · Clarity −2 · EC +⅓…+1
Kodak Tri-X 400
Gritty street B&W · any light
Acros +Y · DR200
Grain Strong/Lg · CCE Strong · FX Blue Off
WB Daylight +9R −9B
H 0 · S +3 · Sharp +1
NR −4 · Clarity +4 · ISO 1600–12800
CineStill 800T
Neon nights · cinematic teal
Eterna-family night look
cool WB · red-orange halation vibe
Grain Strong · deep shadows
see Fuji X Weekly for exact
X-Trans V parameters
Under the hood — what each parameter touches. The X-Trans V sensor uses a 6×6 color-filter pattern (vs Bayer's 2×2) with more randomized green — moiré resistance without an optical low-pass filter, and noise that reads as film-like texture. That's why most recipes set NR −4: at ISO 3200–6400 the grain is character, not garbage. Dynamic Range is the cleverest trick: DR200/DR400 underexposes the sensor by 1–2 stops to protect highlights, then lifts shadows in the tone curve (cost: minimum ISO rises to 250/500) — Portra recipes demand DR400 because negative film's gentle highlight rolloff is literally being emulated by headroom. Highlight/Shadow bend the curve's ends independently; Color Chrome / FX Blue add density in deep saturated colors (X-Trans V blues already run deep — hence FX Blue Off in ported recipes); WB shift is the secret axis (Kodak lives at +R −B); Clarity is powerful local contrast but adds ~1s of processing per frame — the one setting that slows the camera. And RAW is the escape hatch: re-develop any frame into any recipe later, in-camera or via X RAW Studio (which uses the camera's own processor — pixel-identical output).
Discipline that pays
Shoot one recipe for one week. You'll learn what light each palette loves — that's taste-building, not settings-collecting. Keep RAW+JPEG as a safety net for tricky light.
08 — Viewfinder
Three Ways of Seeing
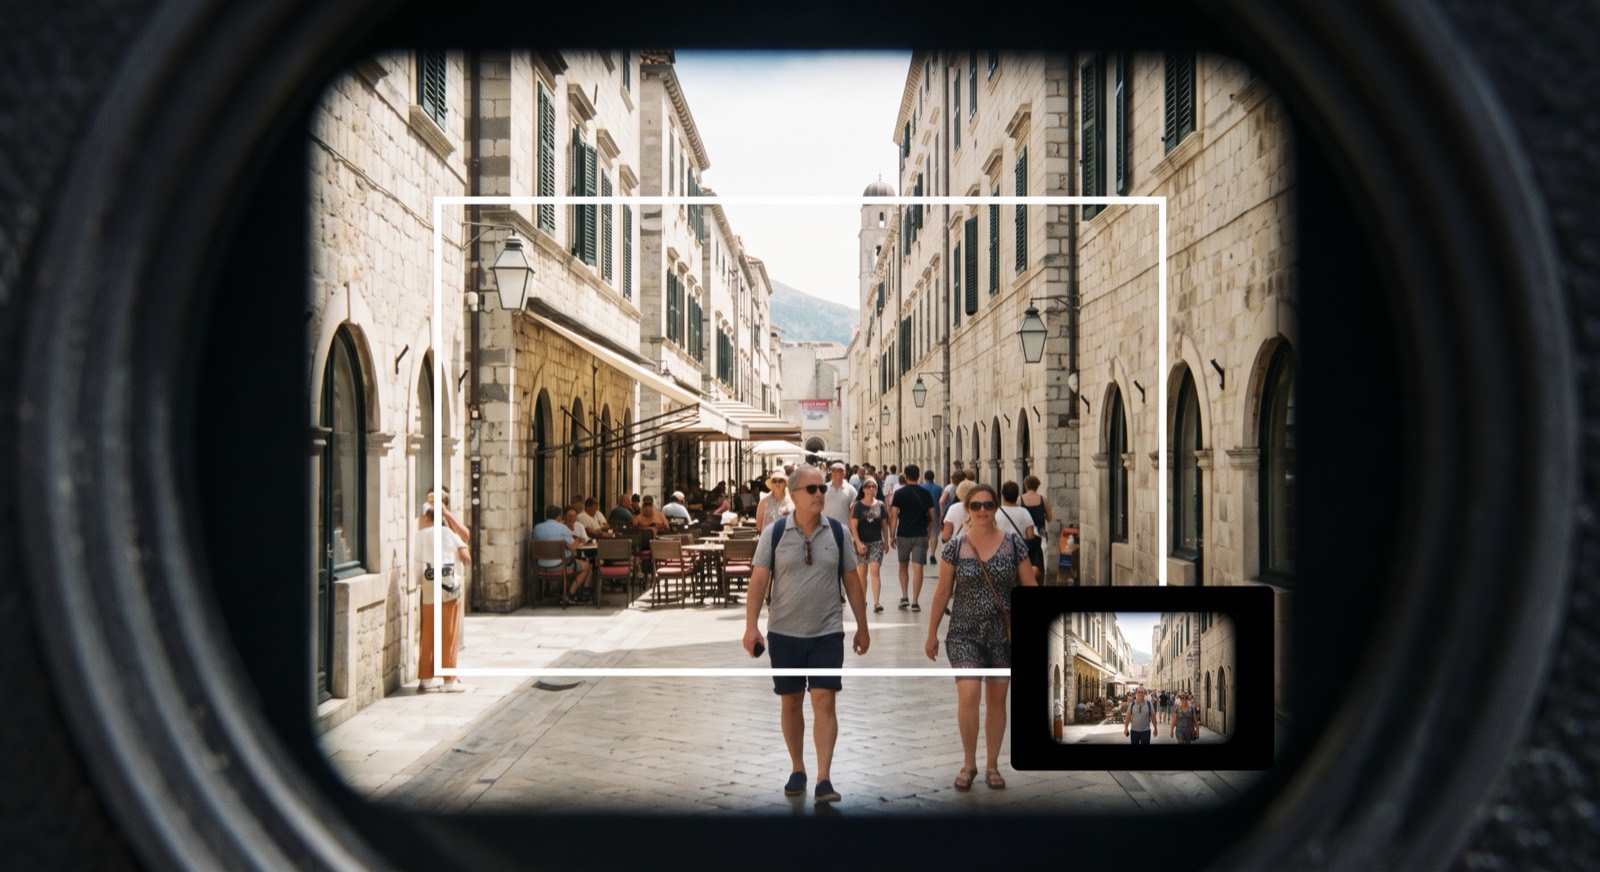
The front lever cycles the hybrid viewfinder — the X100's soul, and most people never leave EVF. OVF is a direct optical window: no lag, no blackout, and you see outside the frame lines — a subject about to enter your composition is visible before they're in it. The decisive moment as a hardware feature. EVF shows the exact JPEG — exposure, recipe, depth of field. ERF overlays a small electronic magnifier on the OVF for focus confirmation while seeing optically.
Practical split: OVF for street & anticipation · EVF for portraits, recipes, close work · ERF when zone-focusing
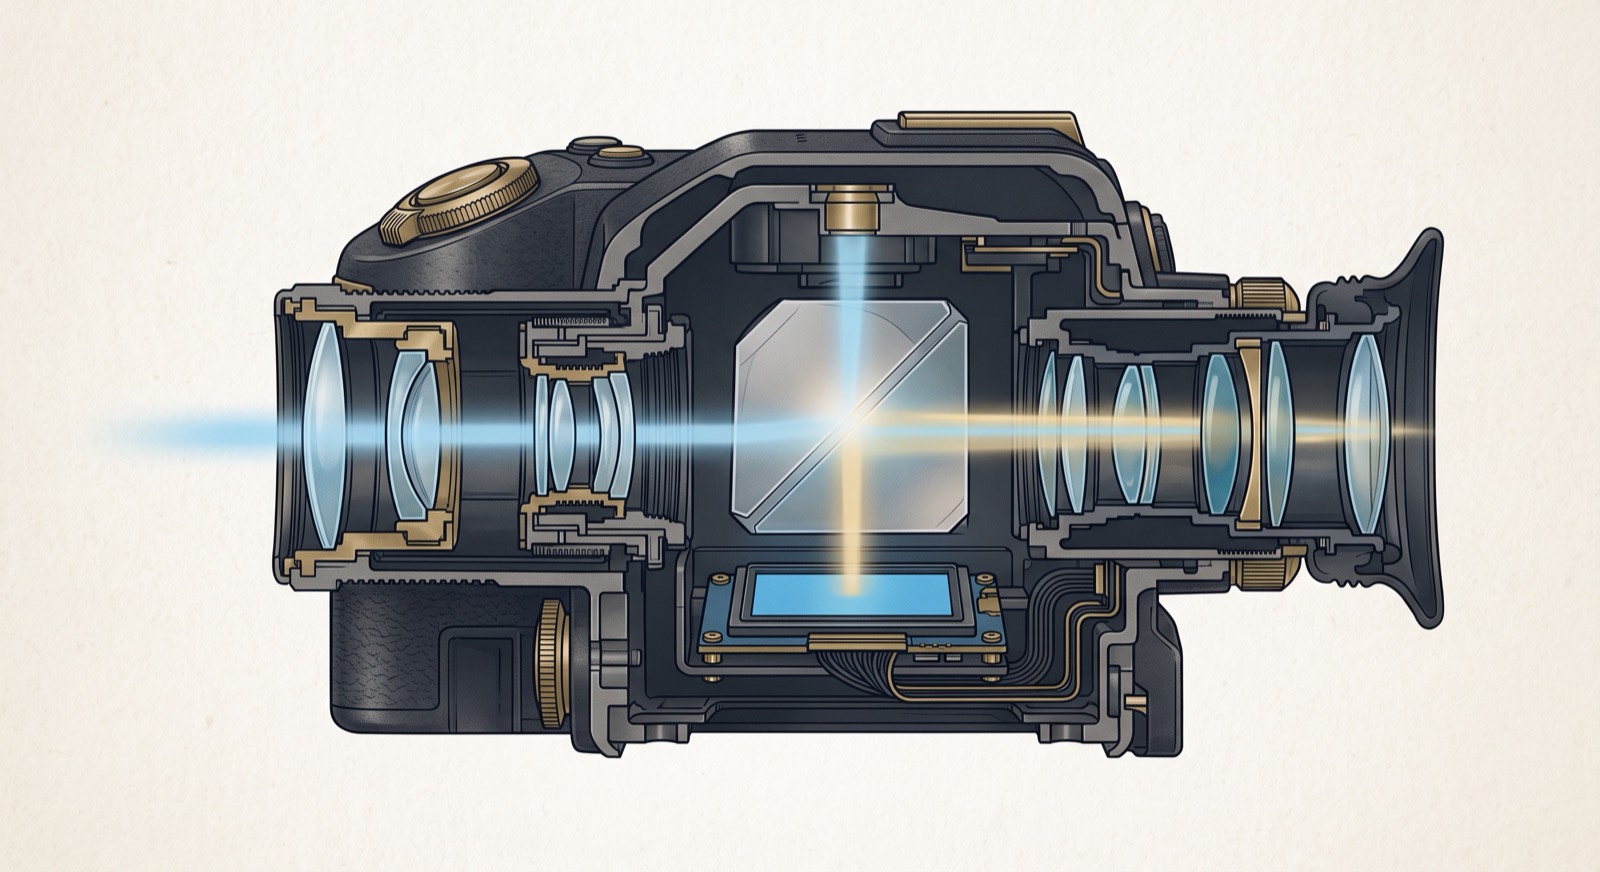
The finder’s plumbing — window light straight through, the EVF folded in by a half-mirrored prism when you ask for it · rendered cutaway (Gemini)
Through the OVF — the frameline is the photo, the world beyond it is your early warning, the corner patch (ERF) confirms focus · rendered view (Gemini)
09 — Real Frames
Straight Off the Sensor
The SVGs above are illustrative — here are actual X100VI exposures, hotlinked from their original hosts (nothing downloaded or re-served) so the credit and full-resolution file stay with the photographer. All four are published under the Unsplash License — free to use, camera confirmed X100VI in each file's EXIF.
Click any frame to open the original on Unsplash — full EXIF (aperture, shutter, ISO) is one click further
10 — Techniques
The Science, Applied in the Field
Sunny 16, internalized. Bright sun: f/16 at 1/ISO. Each lighting drop opens one stop. Why bother with a great meter on board? Because knowing the answer before the camera does makes you notice light itself — and lets you sanity-check the meter when a scene fools it.
Expose for Fuji files: the sensor's shadows lift beautifully; clipped highlights are gone forever. Bias −⅓ to −⅔ EC in contrasty light, lean on DR200/400 for bright skies, watch the histogram, lift shadows later — or let the recipe do it.
IBIS: Stack the Odds
6 stops rated means ~1/2s handheld is possible, not guaranteed. Elbows in, exhale, lean on something, and fire a 3-frame burst — the middle frame is usually the keeper (press and release both shake). IBIS stabilizes you, never the subject: moving people still need 1/125+.
Panning
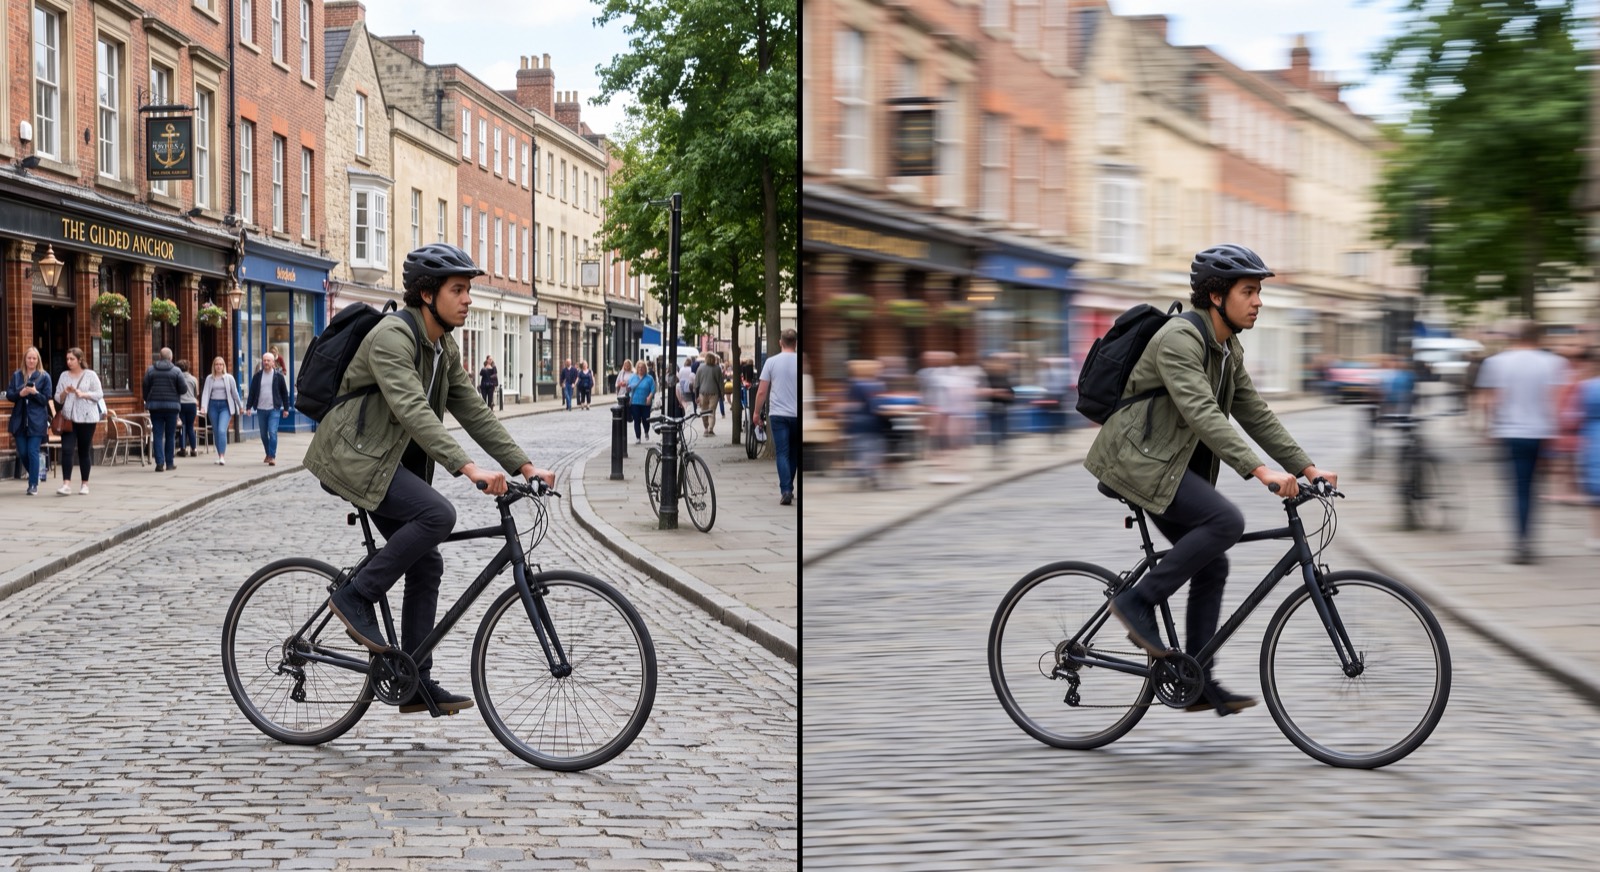
Shutter Priority 1/30–1/60, AF-C, rotate your hips (not arms) tracking the subject, fire mid-swing, follow through. Background streaks, subject holds. At 35mm-equivalent, work close for strong streaks.
Ghost the Crowds
f/16 + ND ≈ 1/8–1/2s in daylight. At a half second, walking pedestrians render as ghosts — the crowd-thinning trick for busy landmarks. Brace or pocket-tripod beyond 1/2s; silky water works the same way.
Low Light, In Order
Open to f/2 → let Auto-ISO climb to 6400 → only then slow the shutter below your minimum. ISO 6400 with Acros or a grain-forward recipe looks intentional; motion blur from a lazy shutter rarely does. ND off — check it.
Digital TC, Honestly
50mm ≈ 20MP — genuinely fine, and it sidesteps the nose-enlarging perspective of true close 35mm portraiture. 70mm ≈ 10MP — web only. It lives on the control ring; RAW records the full frame regardless. Want the pixels back? That's the TCL glass converter (§01).
Flash Beyond Fill
Slow sync at dusk: sharp flash-lit subject over motion-blurred city lights. Second-curtain puts the blur behind movement instead of ahead. Both are built in and leaf-shutter-friendly — pair with ND to tame ambient.
1/500 static vs 1/30 panned — same rider, but only one frame moves; hips do the tracking (card above) · rendered comparison (Gemini)
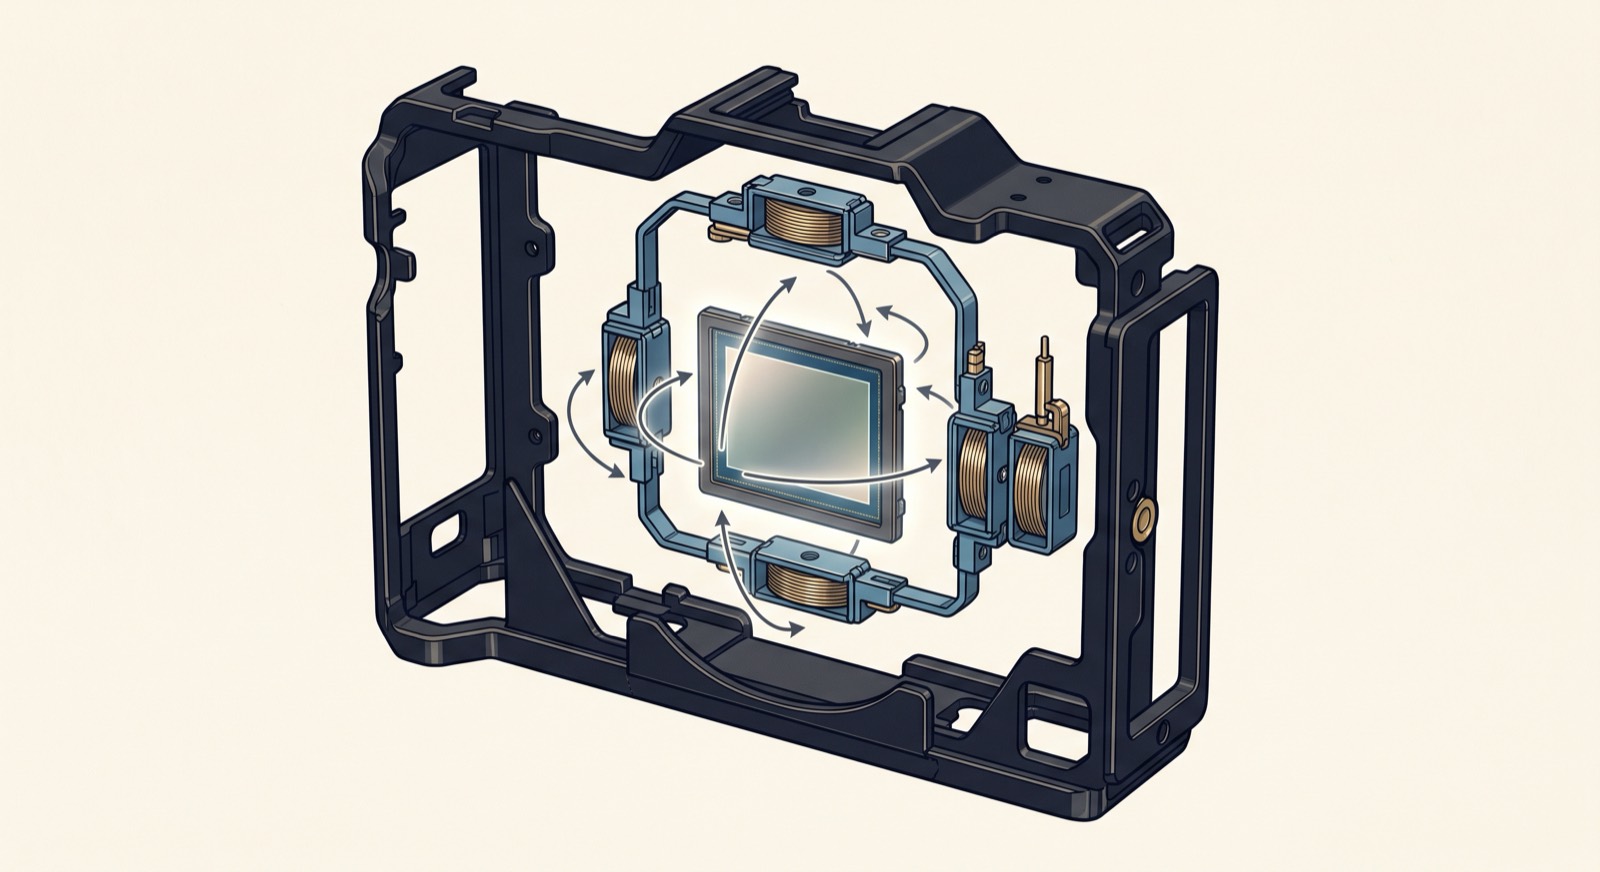
The floating sensor — five axes of correction between your heartbeat and the frame · rendered cutaway (Gemini)
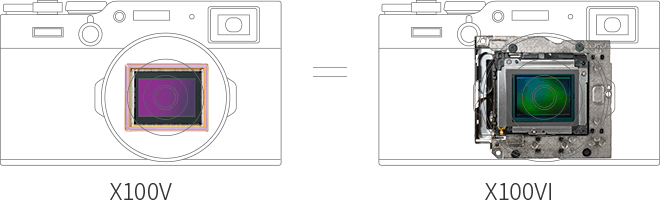
That stabilizer unit is the single biggest hardware difference from the previous body — the V's sensor sat bolted still.
Twelve principles, ordered from grammar to poetry — weighted toward what a fixed 35mm rewards. Turn on the camera's 9-grid framing guide and electronic level (DISP settings) while these become instinct; turn them off after.
01 · Rule of Thirds
Subject on an intersection, horizon on a line. Then break it on purpose.
02 · Leading Lines
Lines enter and travel to the subject. Shoot along them; get low to exaggerate.
03 · Layering
The 35mm superpower: occupy foreground, midground, background. Three planes = inhabited.
04 · Frame in Frame
Doors, arches, gaps. The inner frame concentrates attention — watch subjects approach it in the OVF.
05 · Negative Space
One subject, lots of nothing. The space is pressure — underexpose to deepen it.
06 · Figure to Ground
Tonal separation makes photos readable at a glance. Squint: if the subject vanishes, move.
07 · Light First
Find the shaft, expose for it (−1 EC or spot), let the rest fall to black. Then fish.
08 · Gesture
Mid-stride, raised hand, coat in wind — gesture peaks in fractions of a second. 1/500, burst, anticipate.
09 · Break the Pattern
Patterns become photos when one element rebels. Center symmetry precisely — use the level.
10 · Color Accent
One saturated note in a muted world becomes the subject. Classic Chrome mutes the world for you.
11 · Work the Scene
First frame is the sketch. Move feet: closer, lower, around. Ten frames of one scene beat ten scenes.
12 · Edge Patrol
Poles into heads, amputated limbs, half-objects at edges. The 0.5s border check is the cheapest upgrade in photography.
Get Close
The 35mm frame rewards proximity — its energy comes from being in the scene, not observing it. The small body lowers social pressure; subjects stay natural. If a shot feels flat, take two steps forward, not a crop later.
Fish, Don't Chase
Find a pocket of good light or a strong background, then wait for a subject to enter. The OVF shows action outside the frame lines, so you can time the entrance — a rangefinder trick the EVF can't do.
Exposure Comp as Mood
−⅓ to −⅔ in harsh sun protects highlights and deepens mood; +⅓ to +⅔ on overcast days keeps tones from going muddy. Ride the dial constantly — it's why it's under your thumb.
Environmental Portraits
Don't fight the width — use it. Include context that gives the subject meaning, keep distance between subject and background for separation, and step in slightly when you want a 50mm feel (or engage the digital teleconverter's 50mm crop — 20MP and genuinely usable).
12 — Setup
Make the Camera Disappear
The expert consensus is minimalism: a few deliberate settings, then never think about the camera again.
Exposure
Aperture Priority + Auto-ISO. Min shutter 1/250 for street (1/500 to freeze), max ISO 6400. Manual + Auto-ISO for consistent portrait sessions. File: Fine + RAW, lossless compressed.
Autofocus
Single point, medium box — point, half-press, recompose. Face/subject detect off by default (toggle on a button for portraits). Moving subjects: AF-C + Zone 3×3 + CL burst. Performance: Boost.
Buttons — Only Three
Map ND filter, face-detect toggle, and spot metering. Disable everything else, including touchscreen swipes — your nose will thank you. Fewer controls, faster instincts.
IBIS & Shutter
Up to 6 stops of stabilization — handheld half-second frames are real, but IBIS can't freeze subjects; keep 1/125+ for moving people. Mechanical leaf shutter to 1/4000, electronic beyond for silent f/2 daylight.
The gems the manual buries. Six features from the official guides that rarely make the reviews — each earns its place in a real day of shooting.
The Tilting Screen
The LCD tilts up for waist-level shooting — the classic candid posture: camera at the chest, eyes free, subjects unaware. Tilts down for overhead crowds. Pair with touch-shutter for the quietest possible frame. It sits flush when closed; most people never notice it moves.
MF Assists, Three Flavors
Manual focus isn't guesswork: focus peaking outlines what's sharp, digital split image recreates the rangefinder alignment trick, digital microprism shimmers until focus lands. Turning the ring auto-magnifies (FOCUS CHECK ON). Peaking + zone focus is the street kit (§06).
USB-C Realities
The NP-W126S is rated ~450 frames — a full day if you resist chimping. USB-C charges in-camera from any power bank: coffee-stop top-ups beat spare batteries. The same port turns the camera into a webcam, and X RAW Studio develops RAWs through it (§07).
X App, Quietly Useful
Auto-transfer pushes JPEGs to your phone as you shoot — recipes straight to the group chat before you're home. Geotagging rides the Bluetooth link for free. The remote release is the tripod trick nobody carries a cable for.
Hidden Drive Modes
Under DRIVE: multiple exposure (up to 9 frames, four blend modes — double exposures with recipes baked in), interval timer for timelapse, and motion panorama. The silent leaf shutter makes interval work quiet enough for a bedside window timelapse.
Video, In a Pinch
Not this camera's point — but 6.2K/30p, 4K/60 and F-Log2 live under DRIVE, and IBIS + the built-in ND (§04) make handheld clips genuinely usable. The fixed 35mm-e at f/2 with a silent shutter is quietly a lovely interview setup.
13 — Scenes
Field Notes: One Camera, Every Scene
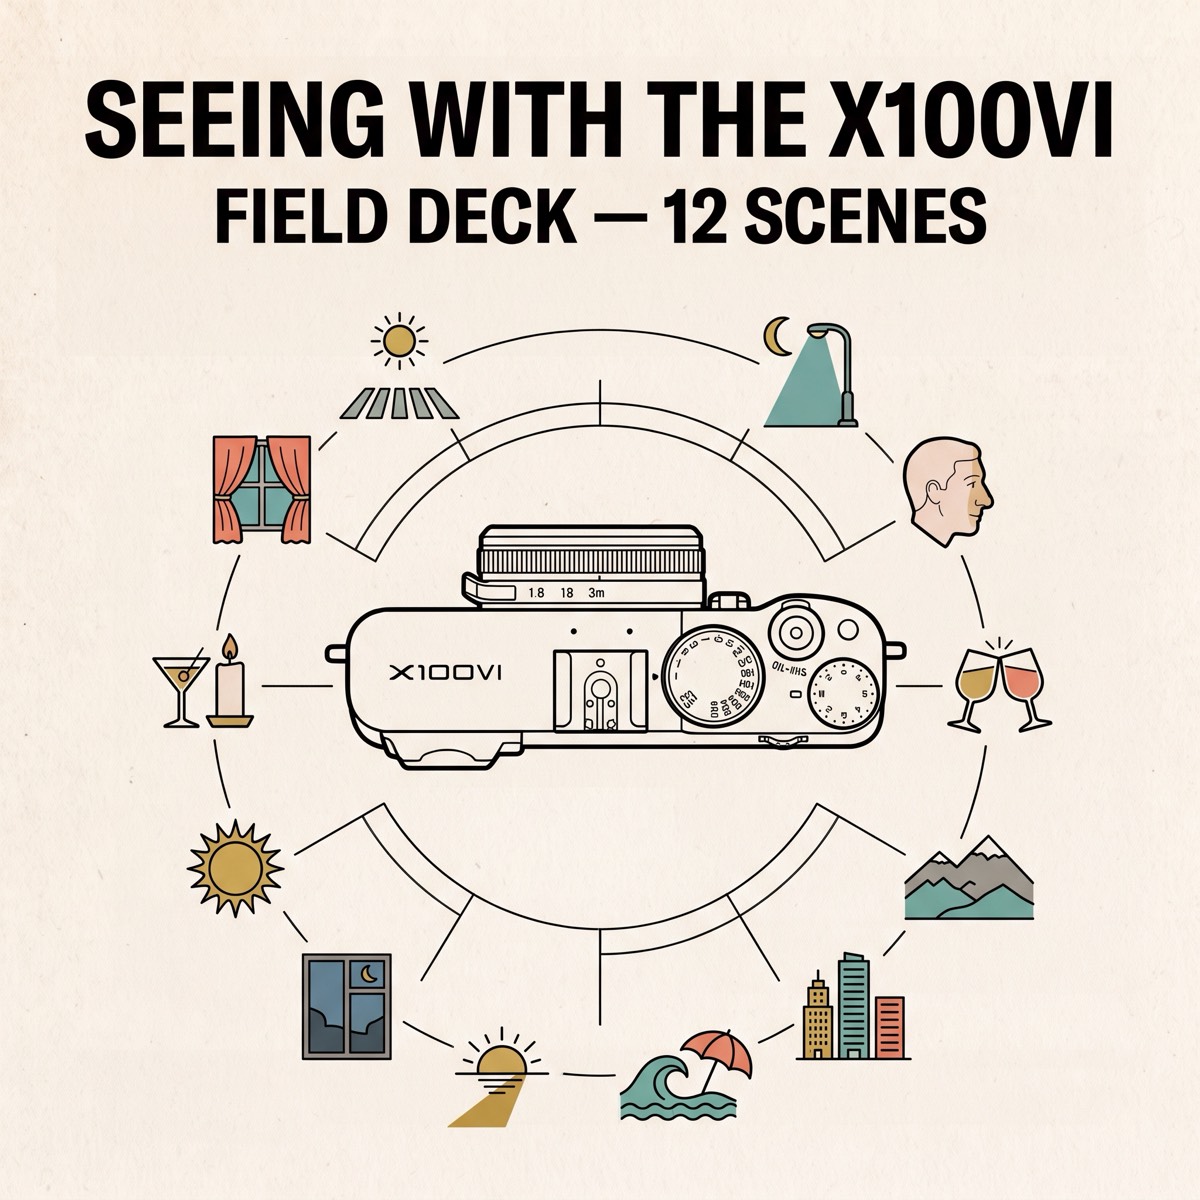
Everything above, applied. These notes assume the §12 baseline — Aperture Priority + Auto-ISO, Fine+RAW — and name only what changes: the settings that matter, the metering move, the craft. A working dozen — each note paired with its field card. Tap any card to read it big, then arrow through the deck.
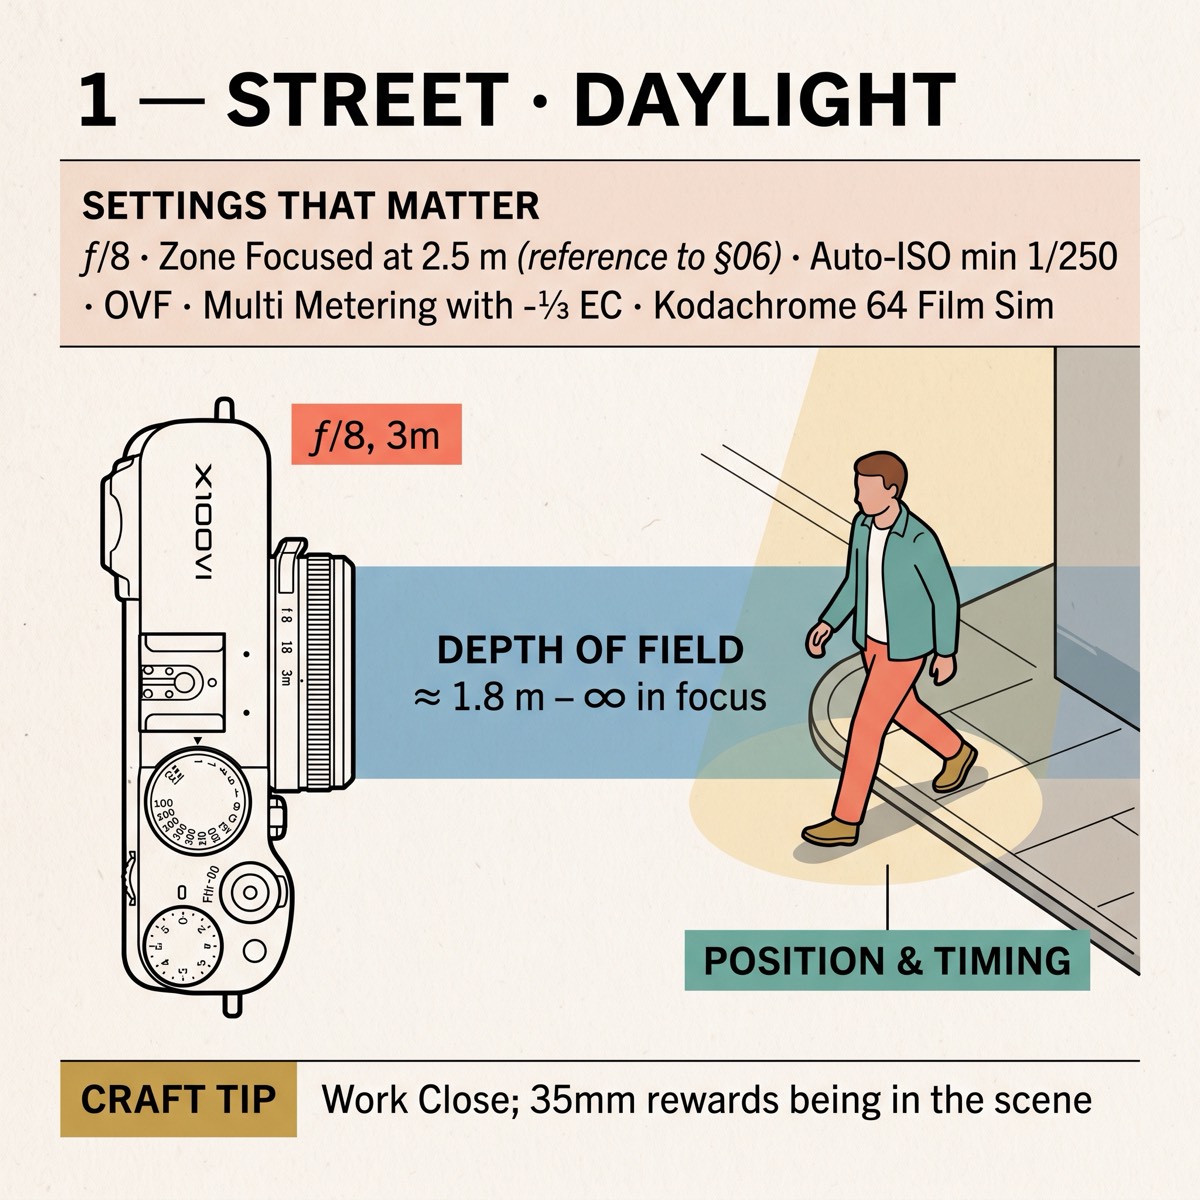
Street · Daylight
f/8, zone-focused at 2.5 m (§06), Auto-ISO min 1/250, OVF, Multi with −⅓ EC. Kodachrome 64. The camera is pre-focused — your whole job is position and timing. Work close; 35mm rewards being in the scene, not across from it.
Street · Night
M + Auto-ISO: f/2 · 1/125, ceiling 12800. −⅔ to −1 EV — let black be black (§03). CineStill 800T. ND off — check it (§04). Find the light pool first, then wait for someone to walk into it.
People & Portraits
f/2–2.8, min 1/250, face detect on its button (§12), Portra 400. At arm's length 35mm grows noses — step back, or crop to 50mm digital TC (§10). Backlit: spot × AF on the face (§03). Talk more than you shoot.
Events You're Attending
Guest first, photographer second — this camera's whole design brief. Silent shutter, f/2.8, Auto-ISO 6400, face detect on. Indoors or dusk: slow-sync flash — the leaf shutter syncs at any speed (§05) — sharp faces floating over candle-blur. No bag, wrist strap, done.
Landscape
f/8 · ISO 125 · DR200 for skies (§10), focus a third into the scene, electronic level on. Snowfields: +1⅔ EV (§03). IBIS + a 3-frame burst replaces the tripod you didn't bring. The light is the subject; the land is the stage.
City & Architecture
f/5.6–8, Classic Chrome mood. Keep the sensor plane parallel — tilting converges verticals; step back instead. Blue hour lights the windows (below). 9-grid on; hunt symmetry, repetition, and the one human that gives it scale (§11).
Beach & Bright Water
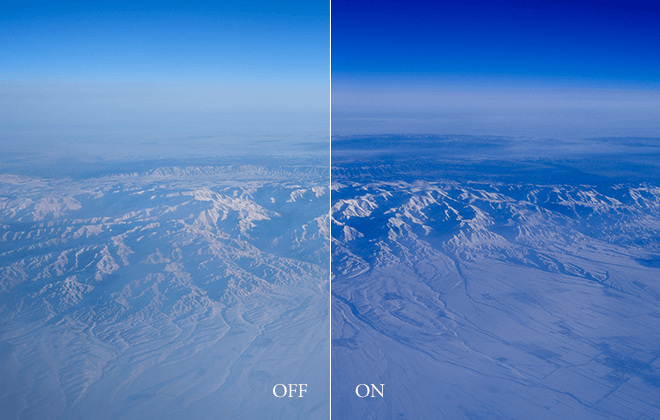
Snow's twin trap: +⅔ to +1⅓ EV over Multi (§03). ND on for f/2 looks or silky water in full sun (§04). Honest caveat: weather resistance requires the filter adapter — salt spray without it is a gamble. Late side-light makes sand three-dimensional.
Golden Hour
Expose for the light, not the scene: spot the lit side, −⅓ EV, let shadows fall (§03). Backlit rim portraits: spot the face, let the sky blow warm. Kodachrome 64 or Portra. Long shadows are free leading lines (§11) — use them before they're gone.
Blue Hour
The 25 quiet minutes after sunset when sky and city lights balance. f/2.8–4, Auto-ISO min 1/60 — IBIS holds static frames to 1/8 (§10). Tungsten WB deepens the blue against amber windows. CineStill 800T was born here.
Harsh Midday
Stop fighting it. Tri-X or Acros+R, −⅔ EV — shoot shadows as shapes (§11). Portraits: daylight fill-flash at f/2 — leaf shutter + ND make it possible at 1/2000 (§05). Or wait twenty minutes; light always moves.
Bars & Dinners Out
f/2, Auto-ISO 12800, min 1/60 — subjects hold still at tables, IBIS does the rest (§10). Spot the candle-lit face, −1 EV keeps the room dark (§03). Silent everything. The X100VI disappears at the table — that's the entire point of it.
Figure & Intimate Work
Consent before craft: agree on boundaries, usage, and storage before the camera appears; delete on request, no questions. Then it's simple: one window, dark room, spot the lit skin and let the rest drop to black (§03). f/2, Acros or Portra. −1 EV sculpts — shapes over exposure. Show frames as you go; it's a collaboration.
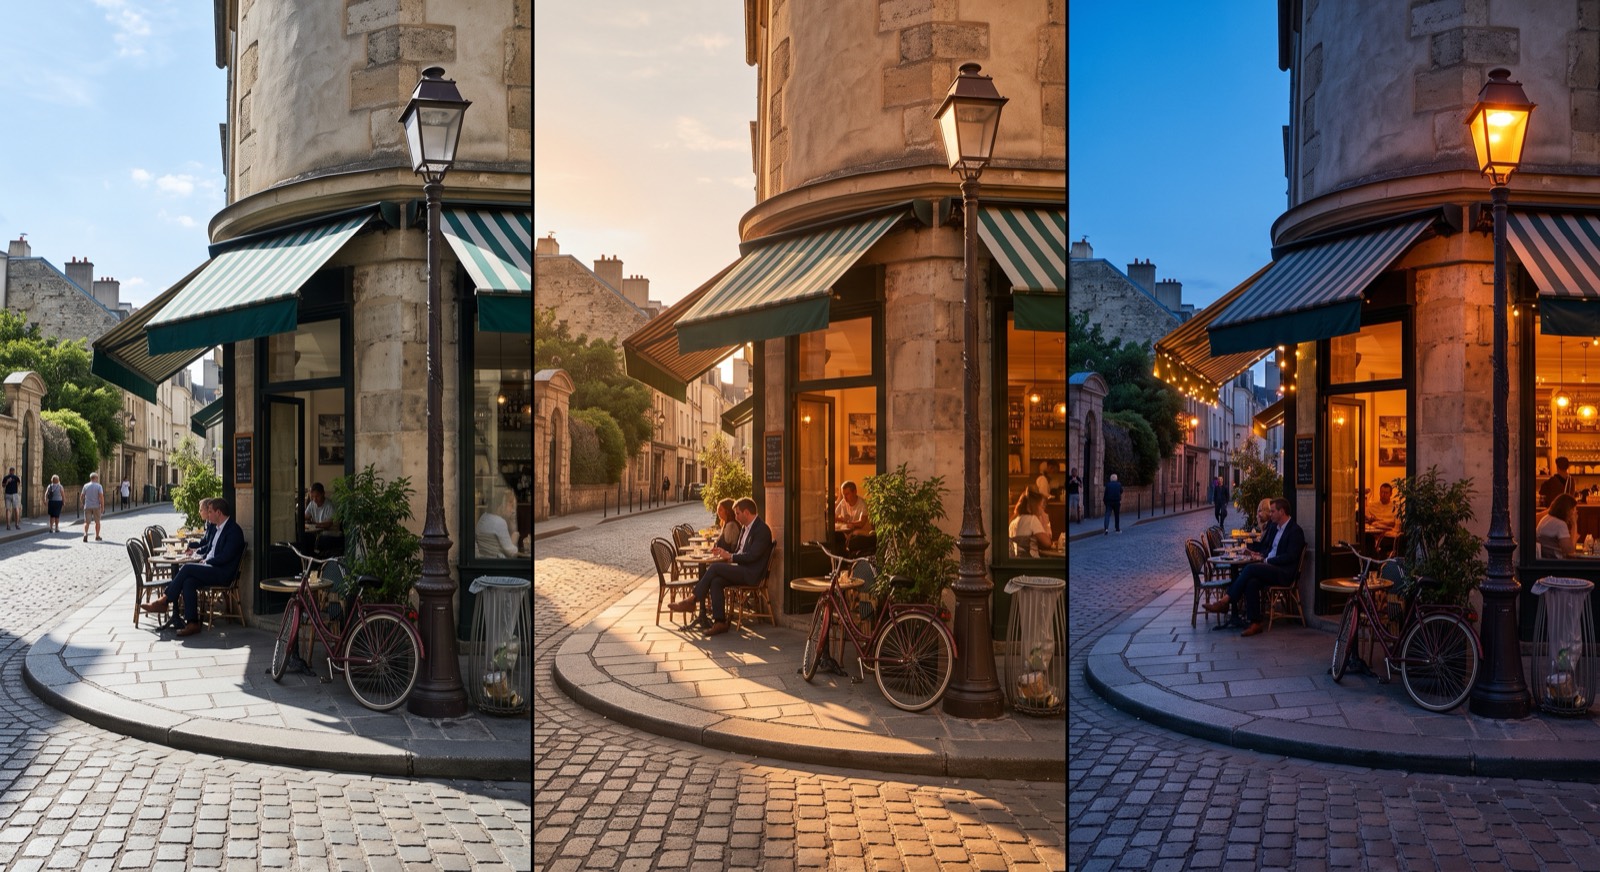
One corner, three light regimes — harsh noon, golden hour, blue hour: the three time cards above, photographed · rendered comparison (Gemini)



 Street · Daylight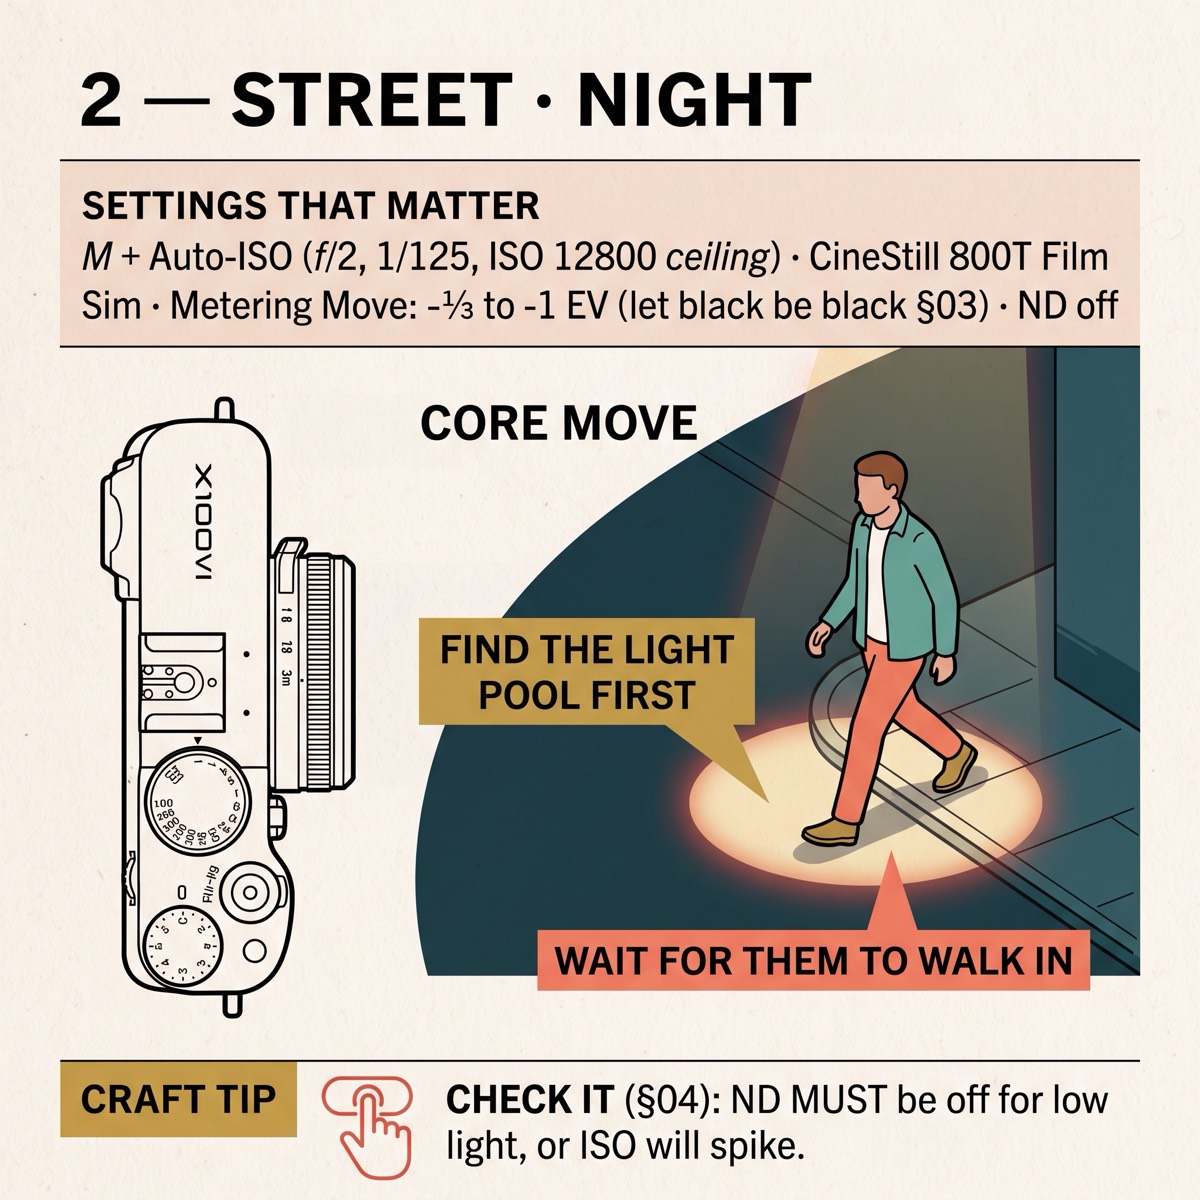
 Street · Night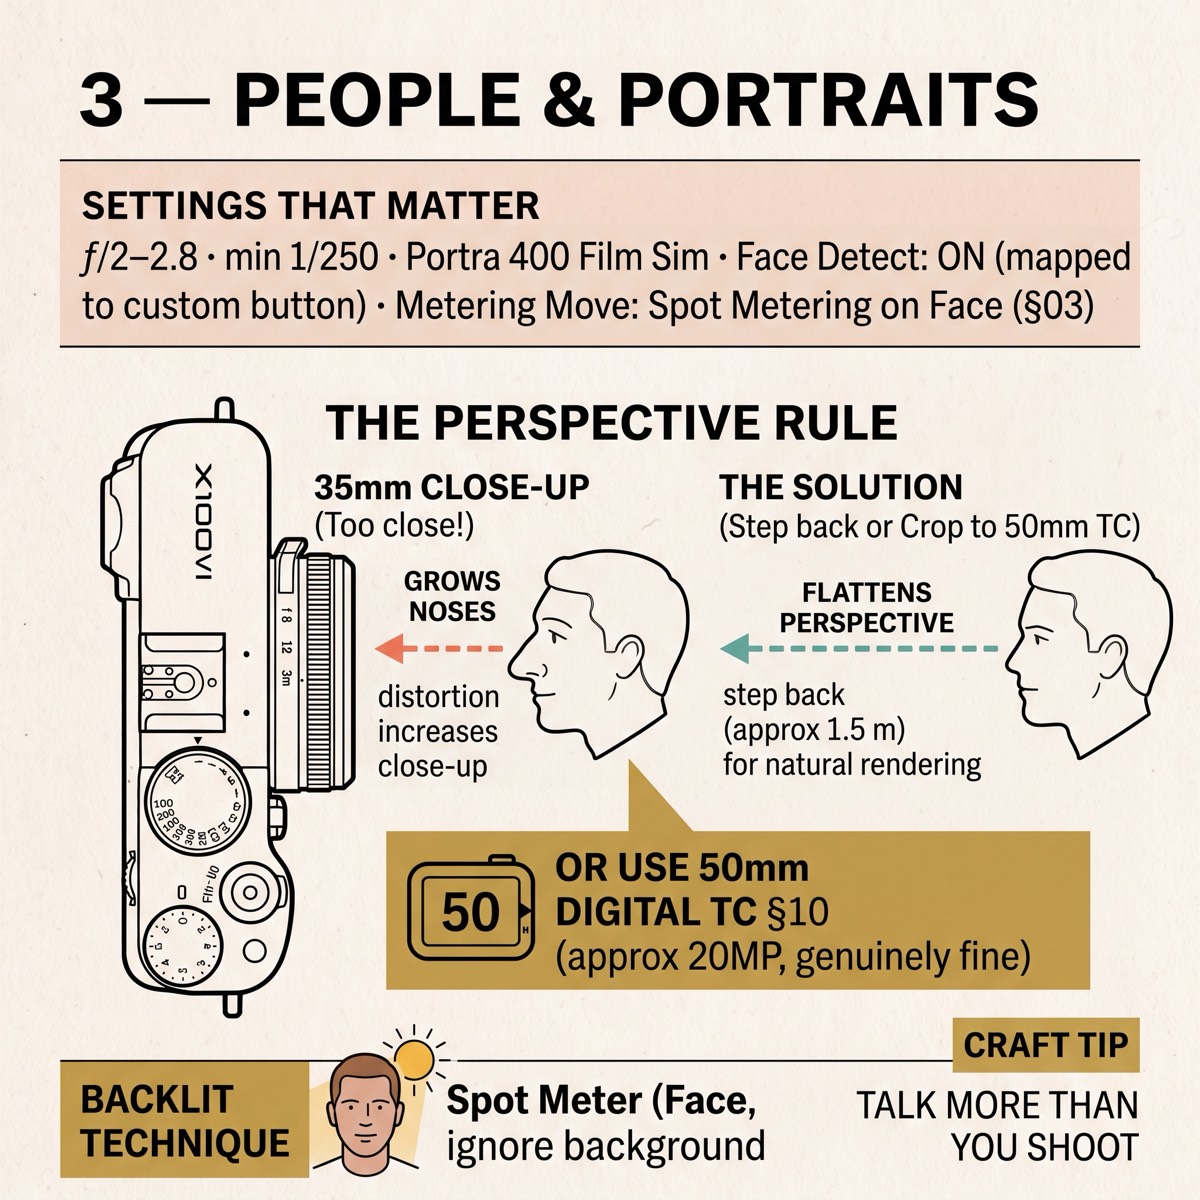
 People & Portraits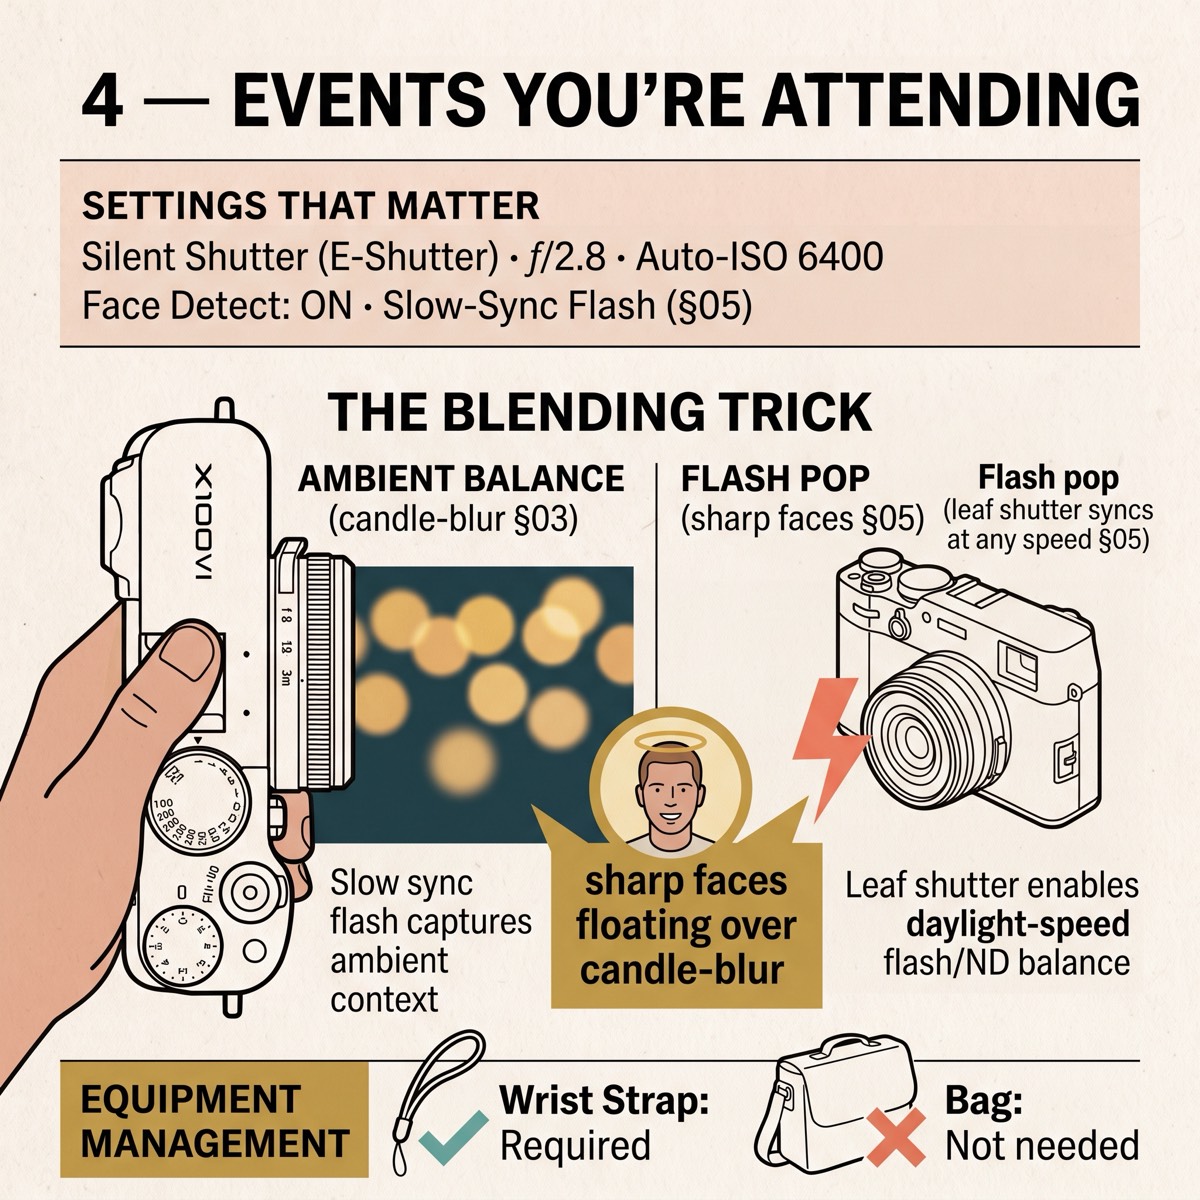
 Events You're Attending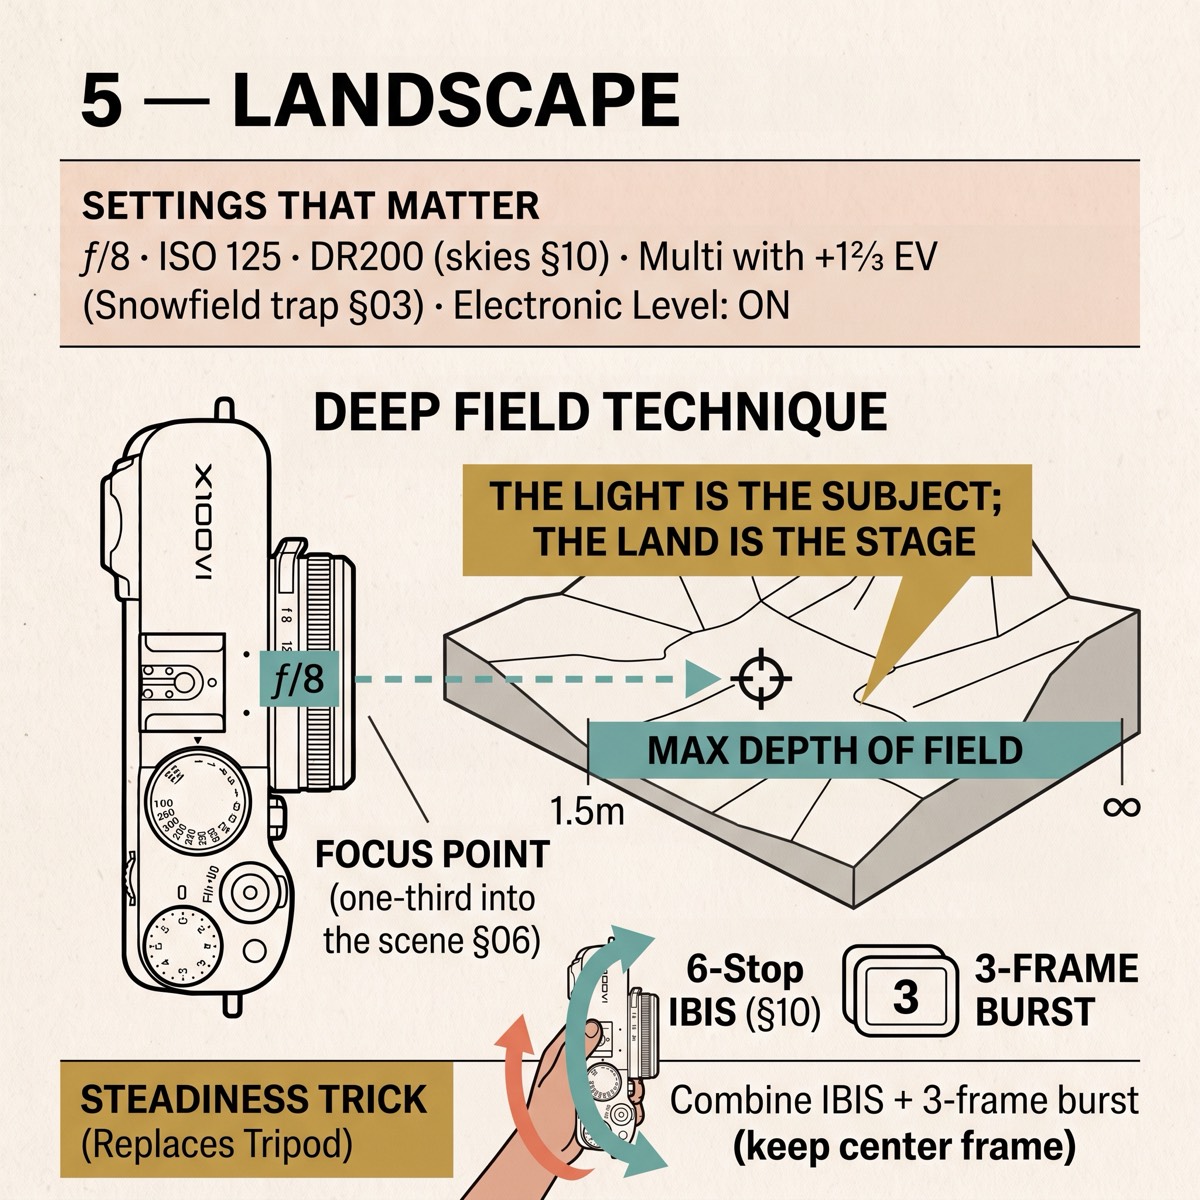
 Landscape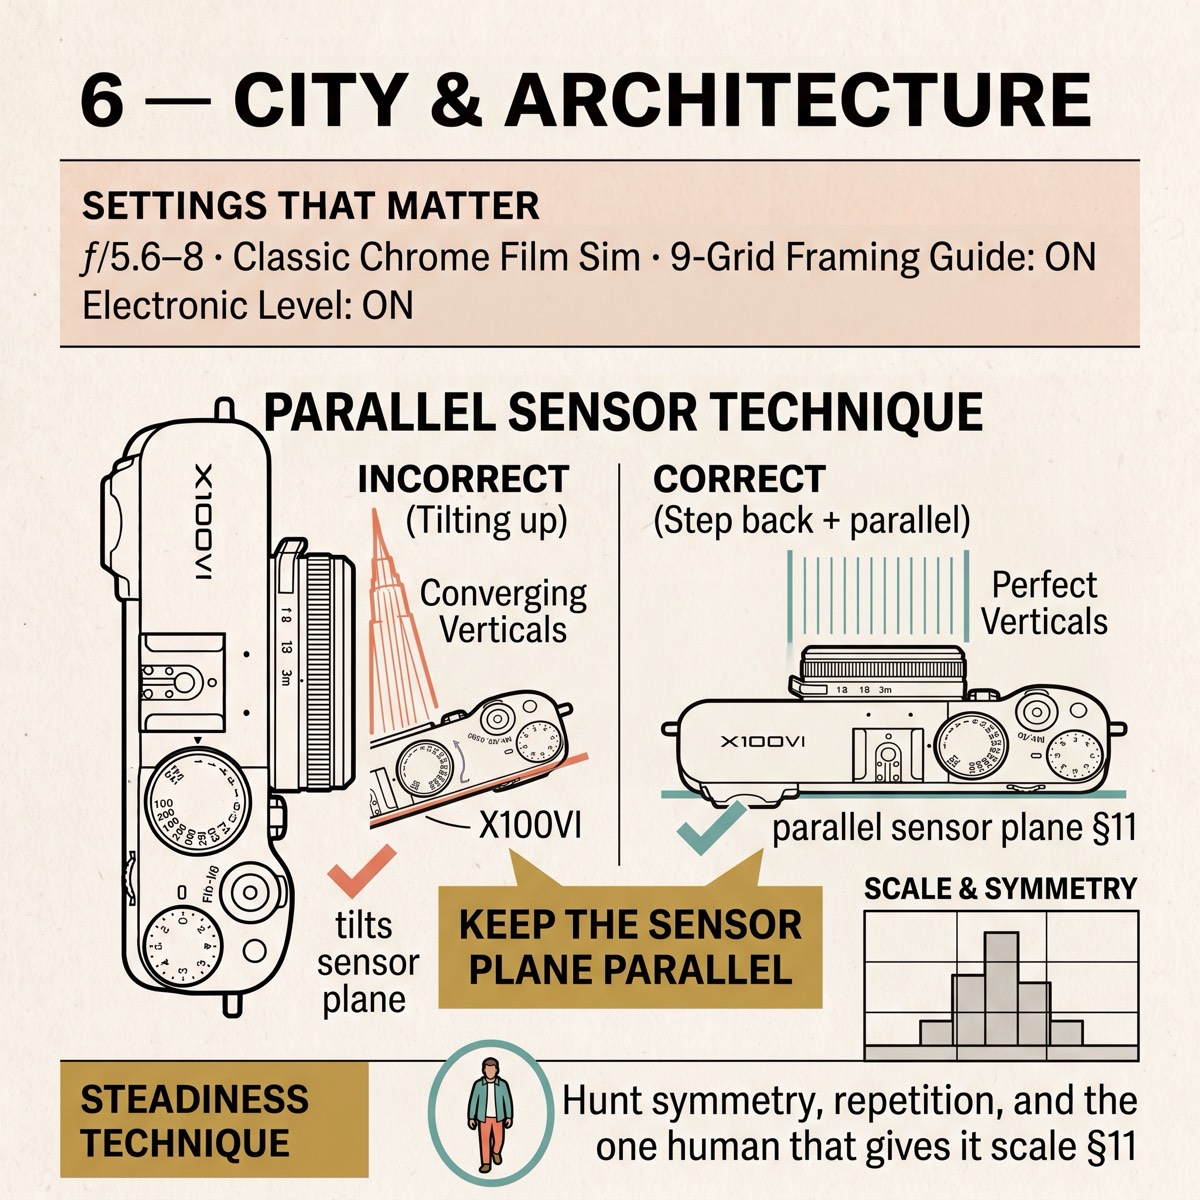
 City & Architecture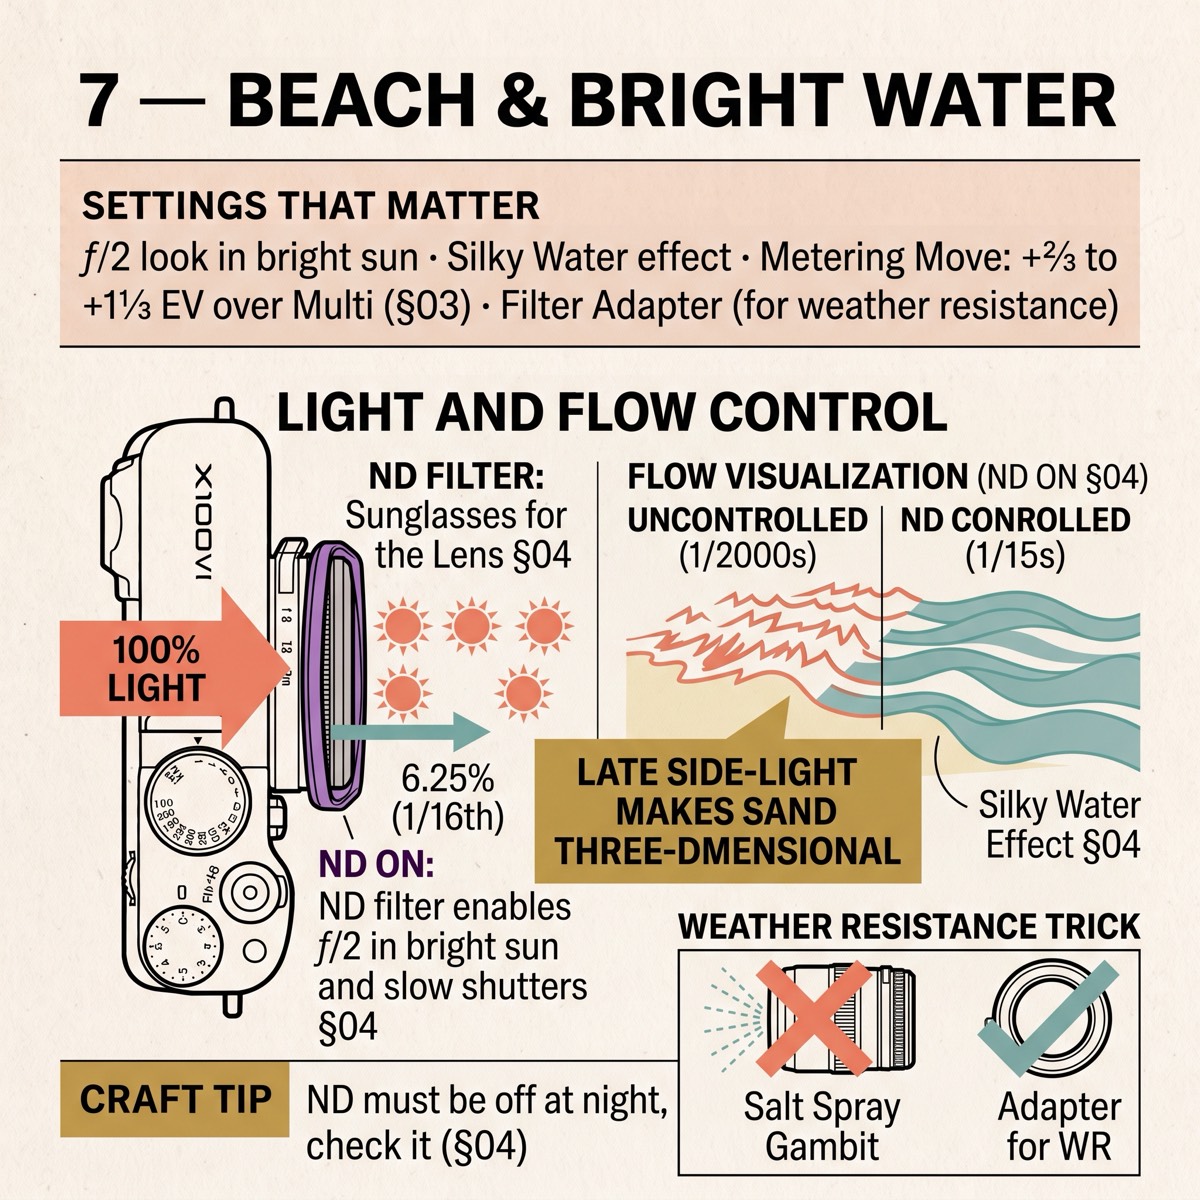
 Beach & Bright Water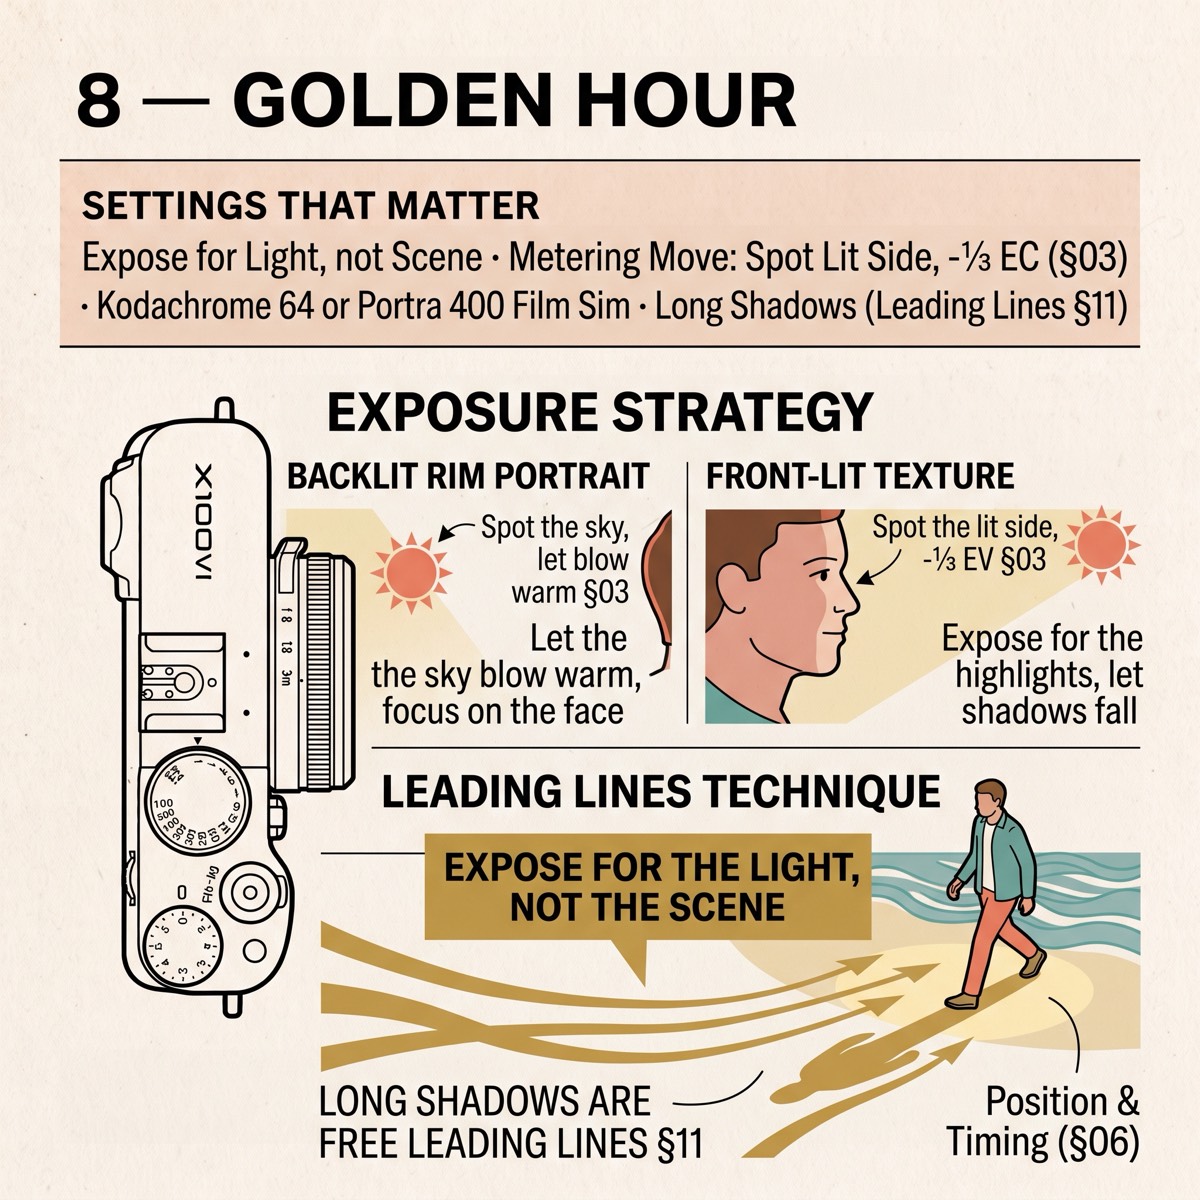
 Golden Hour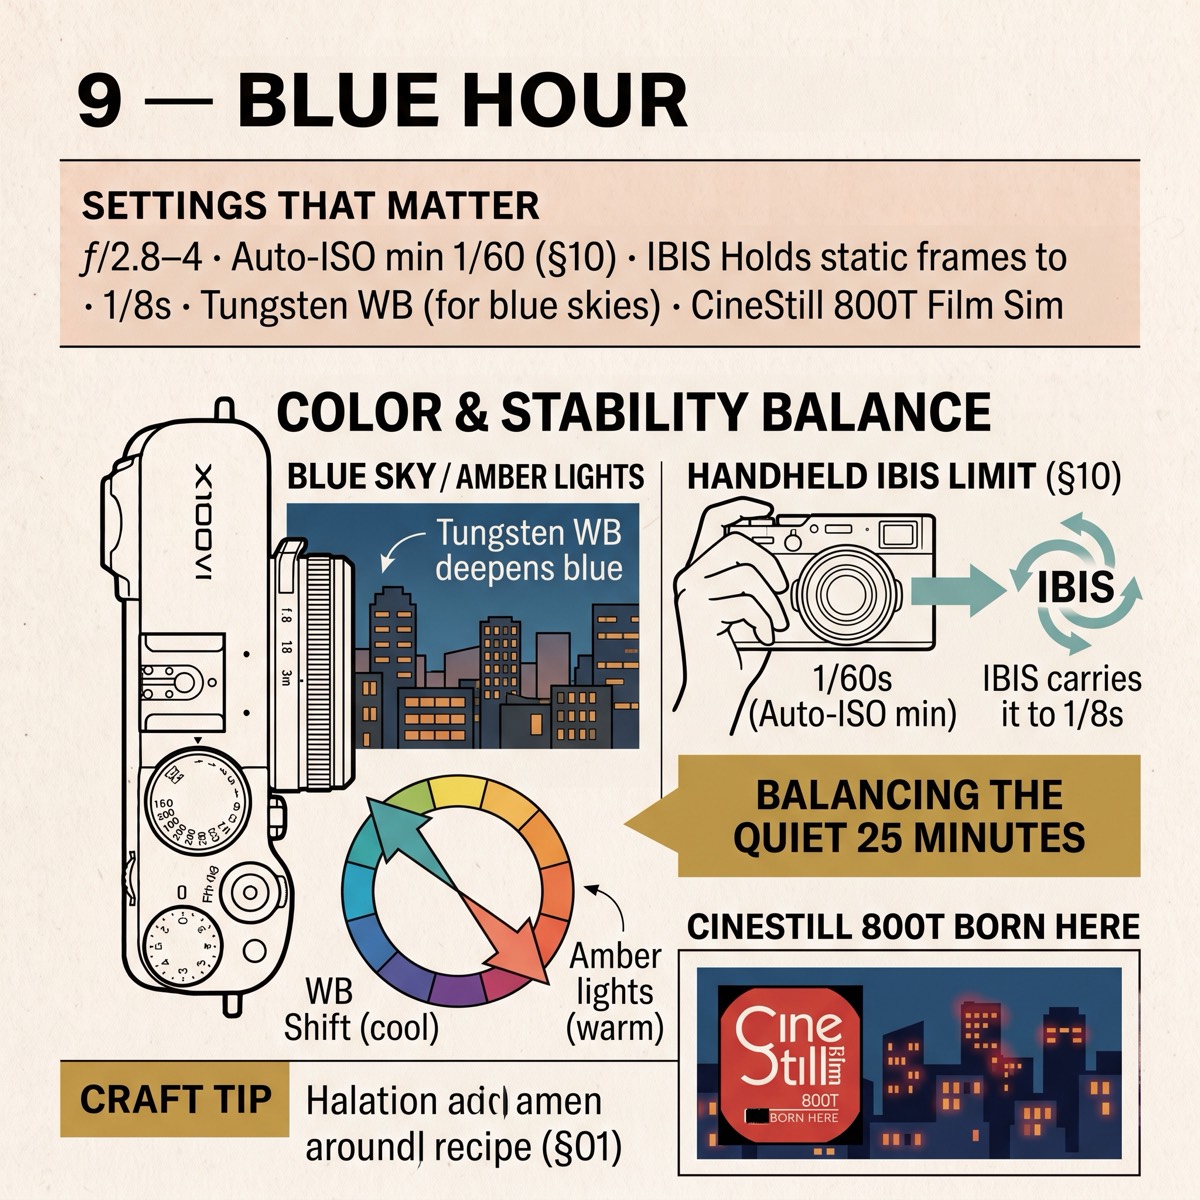
 Blue Hour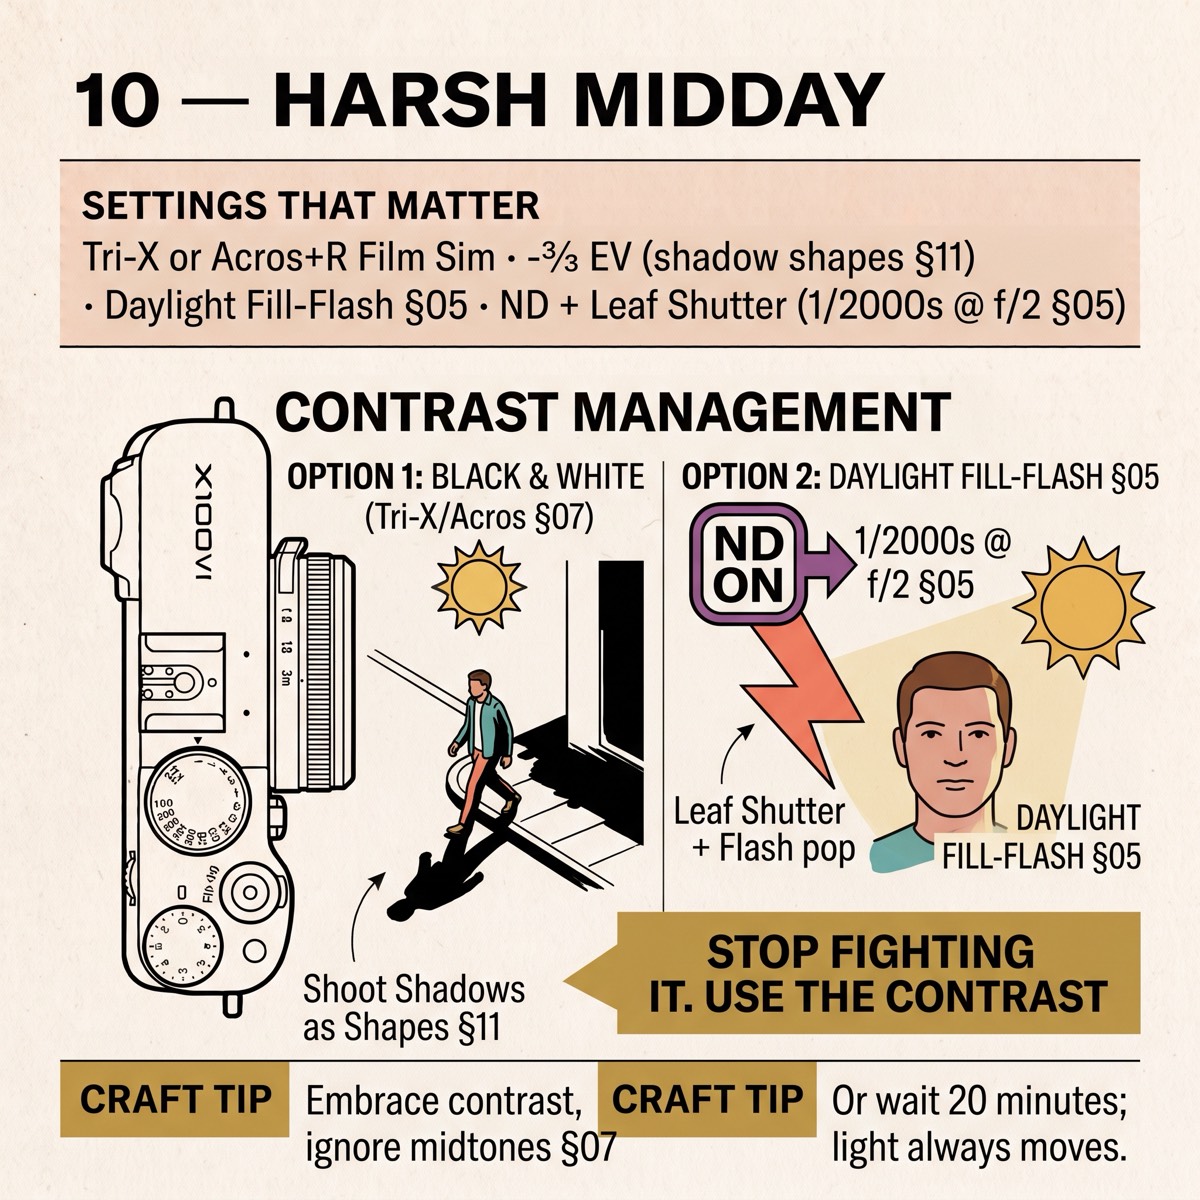
 Harsh Midday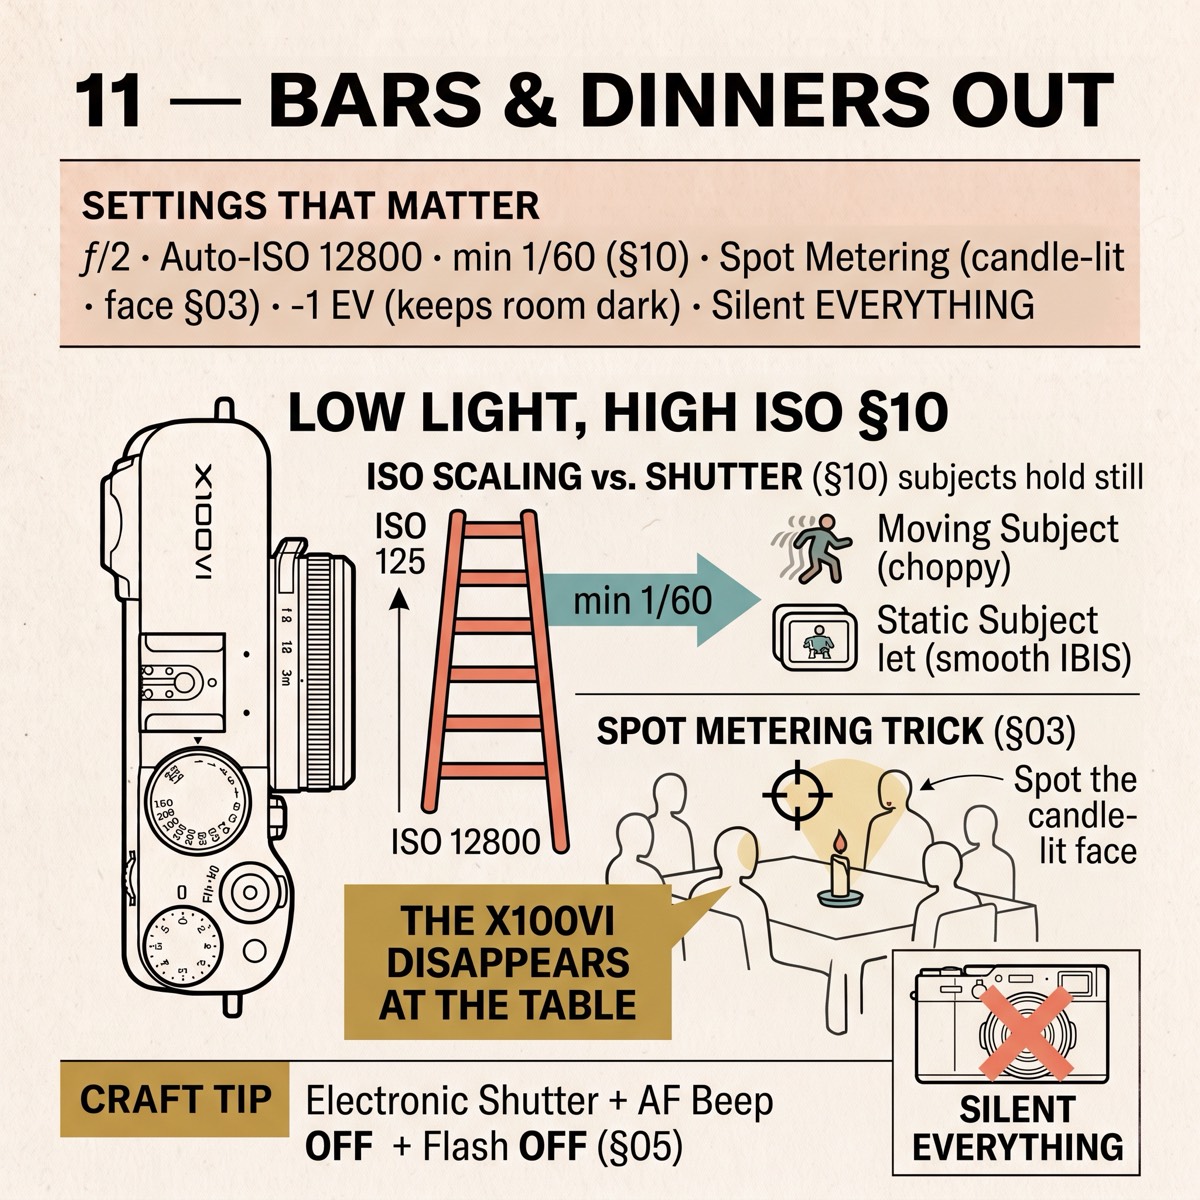
 Bars & Dinners Out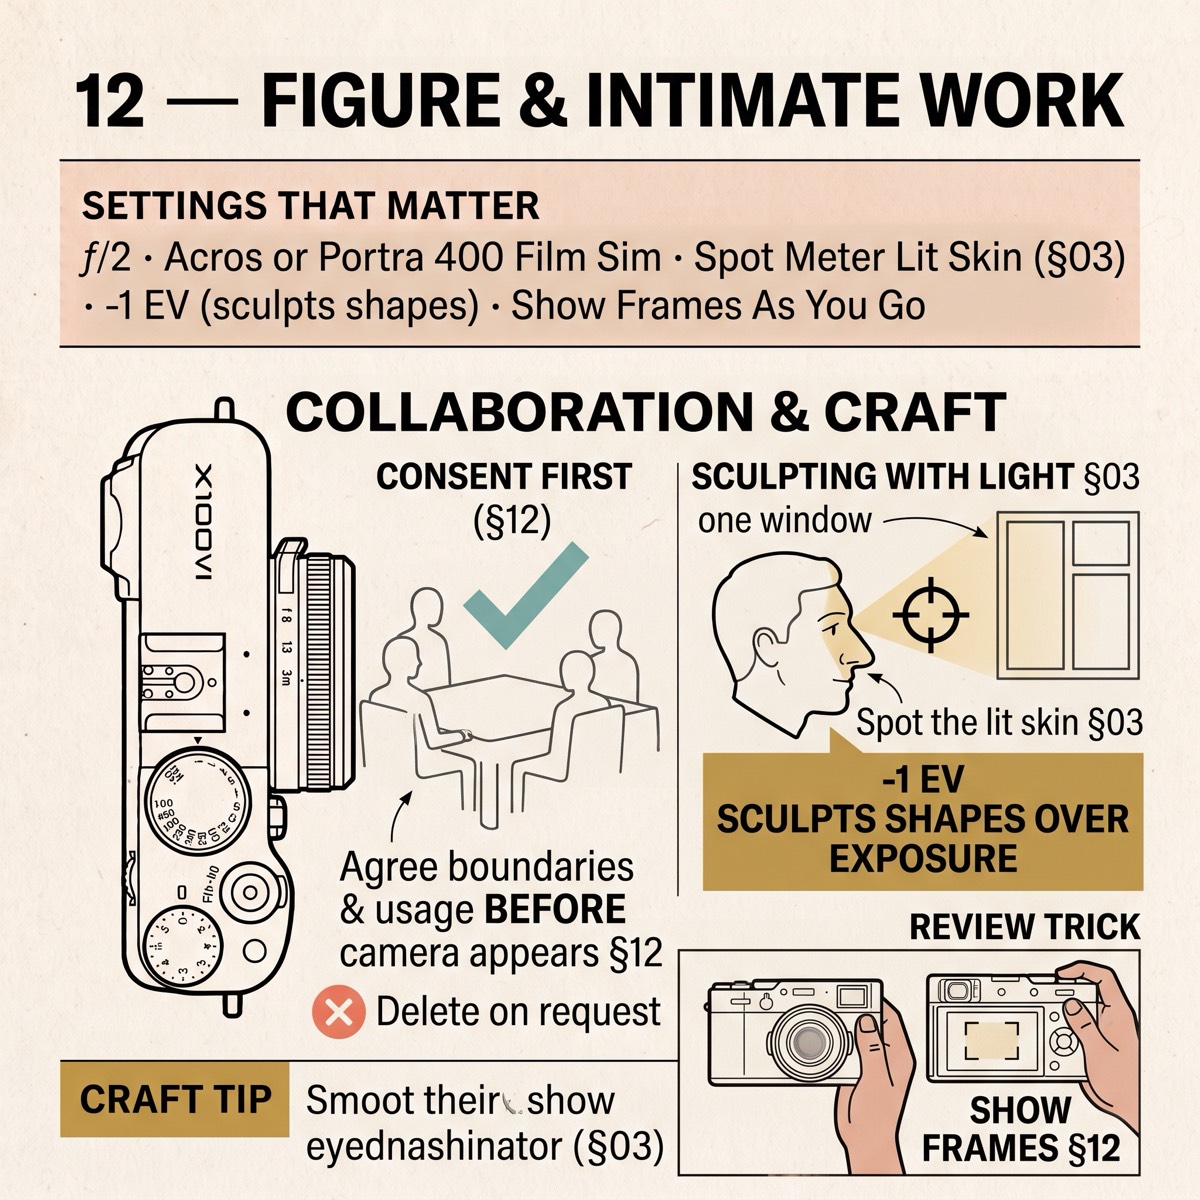
 Figure & Intimate Work